
Card Payments with Vault Token
This document will guide you on how to correctly integrate card payments using a Vault Token via PowerBoard.
This document will guide you on how to correctly integrate card payments using a Vault Token via PowerBoard.
This document will guide you on how to correctly integrate card payments using a Vault Token via PowerBoard.
What is the Vault Token?Click here to learn about Vault Token.
Before you beginWhen sending requests to PowerBoard’s API, you must provide either a Public Key and/or Secret Key depending on your use case.
API keys are generated via PowerBoard’s Merchant Dashboard, in three easy steps:
- Login to the PowerBoard Merchant Dashboard.
- Click on the ‘My Company’ link and proceed to the ‘API and Security’ heading.
- On screen, you’ll see both Public and Secret Key required to send requests to PowerBoard’s API.
You should begin by including PowerBoard's Hosted JavaScript library in your page and creating a container for the PowerBoard widget.
a. Begin by including PowerBoard's Hosted JavaScript library in your page and creating a container for the PowerBoard widget.
b. Initialise the PowerBoard Widget by calling the .load method and the widget's environment to 'preproduction_cba'.
<script src="https://widget.preproduction.powerboard.commbank.com.au/sdk/latest/widget.umd.min.js"></script>

<script>
    var widget = new cba.HtmlWidget('#widget', 'YOUR_PUBLIC_KEY', 'GATEWAY_ID');
    widget.setEnv("preproduction_cba");
    widget.load();
</script>

<div id="widget"></div>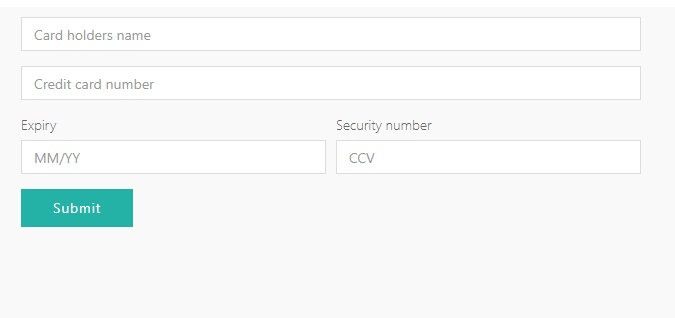
You can use pre-defined methods and parameters to allow you to customise the fields and set styles of the widget. Additionally, you able to monitor real-time customer interactions through the use of the widget's event call-backs.
See below methods and their definitions:
| Method | Description |
|---|---|
| .onFinishInsert | After the 'finish' event of the widget, the 'payment_source' object will be inserted into the input (selector). |
| .setEnv | Method to change PowerBoard environments. |
| .useAutoResize | Method to change PowerBoard environments. |
| .setTexts | Allows you to set custom texts inside the widget. |
| .setStyles | Allows you to set custom styling for the widget. |
| .on | Event listener for the widget, valid events include: - afterLoad |
<script src="https://widget.preproduction.powerboard.commbank.com.au/sdk/latest/widget.umd.min.js"></script>

<script>
    var widget = new cba.HtmlWidget("#widget", "YOUR_PUBLIC_KEY", "GATEWAY_ID");

    widget.onFinishInsert('input[name="payment_source"]', "payment_source");
    widget.setEnv("preproduction_cba");
    widget.useAutoResize();

    widget.setTexts({ submit_button: "Submit Card" });
    widget.setStyles({ background_color: "#FFFFFF", border_color: "#000000", button_color: "#000000" });

    widget.load();

    widget.on("finish", function (data) { console.log("Widget Response", data); })
</script>

<div id="widget"></div>
Our Widget is extensively customisablePlease refer to Widget Customisation guide to learn more about it.
<!DOCTYPE html>
<html lang="en">

  <head>
    <meta charset="UTF-8">
    <title>PowerBoard Widget Example - Card Payments</title>
    <style>
    iframe {
        border: 0;
        width: 100%;
        height: 400px;
    }
    </style>
  </head>
  <body>
    <!-- Container for PowerBoard Widget -->
    <div id="widget"></div>
    <!-- Payment Source Textbox -->
    <center>
      <label for="payment_source"><b>PowerBoard Payment Source</b></label>
    </center>
    <center>
      <input type="text" size="33" id="payment_source" name="payment_source">
    </center>
    <script
      src="https://widget.preproduction.powerboard.commbank.com.au/sdk/latest/widget.umd.js"></script>
    <script>
    var widget = new cba.HtmlWidget("#widget", "YOUR_PUBLIC_KEY", "GATEWAY_ID");

    widget.onFinishInsert('input[name="payment_source"]', "payment_source");
    widget.setEnv("preproduction_cba");
    widget.useAutoResize();
    widget.setTexts({submit_button: "Submit Card"});
    widget.setStyles({background_color: "#FFFFFF", border_color: "#000000", button_color: "#000000"});

    widget.load();

    widget.on("finish", function(data) {console.log("Widget Response", data);});
    </script>
  </body>
</html>
After submission of card details, the widget will return a "finish" event containing the below parameters within the object:
{
    "event": "finish",
    "purpose": "payment_source",
    "message_source": "widget.paydock",
    "ref_id": "",
    "widget_id": "012aa127-6b01-2e9e-f3c8-8d54e54c3ece",
    "payment_source": "251985e6-a368-4168-8e1a-bfb30c3e4bab"
}Get the
payment_sourcevalue from the Finish event response
Use the payment_source returned from the Widget in your API Tokenise request, see below example:
| API Endpoint | https://api.preproduction.powerboard.commbank.com.au/v1/vault/payment_sources |
|---|---|
| HTTP Method | POST |
| Headers | x-user-secret-key- POWERBOARD_SECRET_KEY - This is your PowerBoard API Secret Key. Content-Type - application/json - Content-Type will always be application/json. |
| Request Parameters | token - string - payment source string returned from the widget following the "finish" event. Example: "payment_source": "251985e6-a368-4168-8e1a-bfb30c3e4bab" |
Once you have submitted your API Tokenisation request, PowerBoard will respond accordingly with a 201 Created. The response should be stored against your database or relevant payments ecosystem.
{
    "token": "251985e6-a368-4168-8e1a-bfb30c3e4bab"
}
{
    "status": 201,
    "error": null,
    "resource": {
        "type": "payment_source",
        "data": {
            "type": "card",
            "_source_ip_address": "54.86.50.139",
            "expire_month": 1,
            "expire_year": 2023,
            "card_name": "John  Citizen",
            "card_number_last4": "4242",
            "card_number_bin": "42424242",
            "card_scheme": "visa",
            "ref_token": "cus_hyyau7dpojJttR",
            "status": "active",
            "created_at": "2021-08-05T07:04:25.974Z",
            "company_id": "5d305bfbfac31b4448c738d7",
            "vault_token": "c90dbe45-7a23-4f26-9192-336a01e58e59",
            "updated_at": "2021-08-05T07:05:56.035Z"
        }
    }
}You can now utilize the returned "vault_token" to charge the customers card via the PowerBoard API. See below example request and response.
| API Endpoint | https://api.preproduction.powerboard.commbank.com.au/v1/charges |
|---|---|
| HTTP Method | POST |
| Headers | x-user-secret-key- POWERBOARD_SECRET_KEY - This is your PowerBoard API Secret Key. Content-Type - application/json - Content-Type will always be application/json. |
| Request Parameters | amount - string - Total amount for the transaction. currency - string - Always set to 'AUD'. customer.payment_source.vault_token - string - Token containing stored customer card information customer.payment_source.gateway_id - string - Unique identifier for Payment Processor |
Once you have submitted your API charge request, PowerBoard will respond accordingly with a 201 Created. The response should be stored against your database or relevant payments ecosystem. The vault token can continue to be called upon to charge a customer's card.
{
    "amount": "10.00",
    "currency": "AUD",
    "customer": {
        "payment_source": {
            "vault_token": "c90dbe45-7a23-4f26-9192-336a01e58e59",
            "gateway_id": "5dde1f3799cfea21ed2fc942"
        }
    }
}
{
"status": 201,
"error": null,
"resource": {
"type": "charge",
"data": {
"transfer": {
"items": []
},
"customer": {
"payment_source": {
"type": "card",
"card_name": "John Citizen",
"card_number_last4": "4242",
"card_number_bin": "42424242",
"expire_month": 1,
"expire_year": 2023,
"gateway_id": "5dde1f3799cfea21ed2fc942",
"vault_token": "8617374d-2a5f-405b-aa9e-a9e942dd7c95",
"card_scheme": "visa",
"gateway_name": "CommBank",
"gateway_type": "CommBank",
"card_funding_method": "CREDIT",
"card_issuer": "FISERV SOLUTIONS, LLC",
}
},
"status": "complete",
"capture": true,
"authorization": false,
"archived": false,
"one_off": true,
"_id": "60a193b2079e3f2cb2d9ba5a",
"company_id": "5d305bfbfac31b4448c738d7",
"amount": 10,
"currency": "AUD",
"items": [],
"transactions": [
{
"type": "sale",
"status": "complete",
"gateway_specific_code": null,
"gateway_specific_description": null,
"error_message": null,
"error_code": null,
"status_code": null,
"status_code_description": null,
"_id": "60a193b2079e3f2cb2d9ba5a",
"created_at": "2021-01-21T14:46:10.849Z",
"amount": 10,
"currency": "AUD",
"external_id": "ch_1DC3QJIXZXv8Hpj44W7I00eOr",
"remittance_date": "2021-01-22T14:46:10.852Z",
"authorization_code": "821802"
}
],
"updated_at": "2021-01-21T14:46:11.804Z",
"created_at": "2021-01-21T14:46:10.852Z",
"__v": 0,
"external_id": "ch_1DC3QJIXZXv8Hpj44W7I00eOr"
}
}
}