
Charges
A Charge is a single payment request. It is created through a payment source and linked to a unique ID. A Charge in your account is not necessarily a financial transaction and could include authorisation, refund, void or status change. Managing Charges lets you control the billing and processing of one-off payments or automated subscriptions.
Charge status
Charge statuses help diagnose any issues and act on amendments:
| Charge Status | Description |
|---|---|
| complete | a charge has been completed successfully |
| refund_requested | a refund was requested, but the gateway did not return the actual status (it usually requires some time). The status will be updated automatically by the scheduled task or manually by the specific endpoint |
| failed | a charge was unsuccessful |
| pending | a charge awaits capture or cancel |
| void_requested | a void was requested, but the connected service did not return the actual status. The status will be monitored by us until a result is returned. It can also be manually checked |
| capture_requested | a capture was requested, but the connected service did not return the actual status. The status will be monitored by us until a result is returned |
| refunded | a refund is successful |
| inprogress | an intermediate status (short-lived) |
| held | charge status is currently on hold |
| archived | a charge is archived |
| not_authenticated | 3ds is not supported |
| pre_authenticated | 3ds is successfully created and accepted by the user |
| pre_authentication_pending | 3ds is successfully created and awaits to be accepted by the user |
| cancelled | a charge was cancelled |
| wallet_initialized | the initialization of the wallet has been completed successfully |
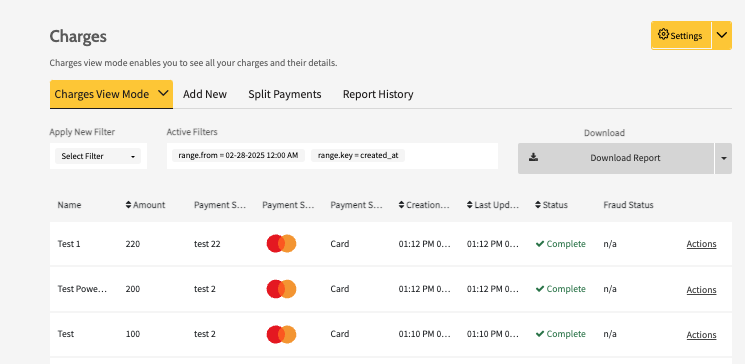
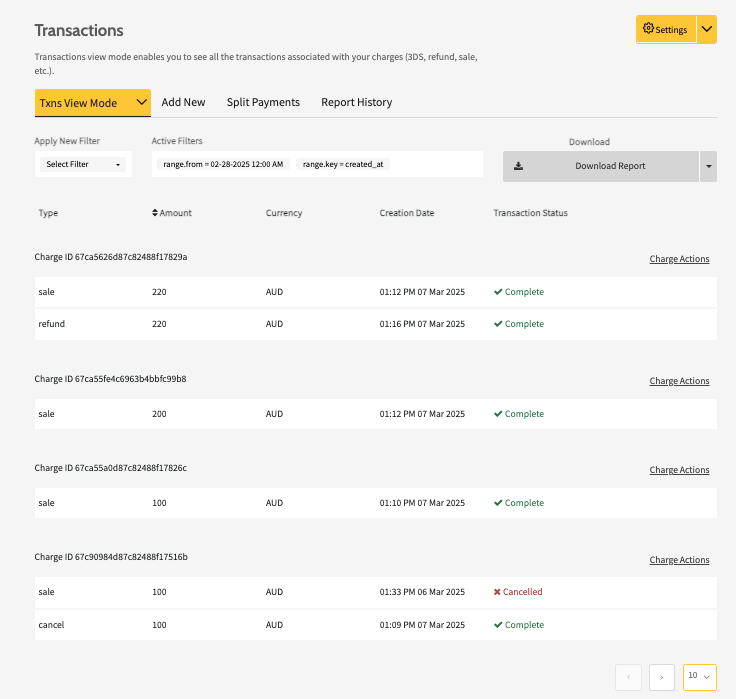
Charges View Mode Vs Transaction View Mode
| Charges View Mode | Transaction View Mode |
|---|---|
| Charges View Mode maintains one record for a set of transaction types such as 3DS, sale, pre auth etc, performed . | Transaction View Mode displays separate records for different type of transactions such as 3DS, sale, pre auth, capture, refund. |
| Single record appear for a charge even if multiple transaction types actioned against it in the reports/downloaded filtered items. | Separate records of different transaction types appear in the reports/ downloaded filtered items which helps in easy reconciliation. |
 |  |
Add New Charges
To add a new, one-off Charge, which will not save the customer’s details or payment data:
- Go to Charges > Add New.
- Under the Select Payment type drop-down list, select Charge.
- Complete the Customer’s Personal Information, Address, Payment Details and Payment Information.
- (optional) Under Customs Fields, you can add Name and Value or select a previously created Custom Field from the Name drop-down list.
Custom fields transfer any metadata to the payment gateway or store it in the account. By providing another searchable data point, these fields ease the reporting on the activity within the dashboard. You can insert any Name or Value in JSON format that suits your requirements. However, to successfully pass the information to the Gateway, ensure the value complies with the gateway requirements. Selecting ready Custom Fields reduces the time of adding a new Charge with additional data. You can choose up to 25 custom fields. - Click Create Charge.
NoteEvery Service has a set of required fields. If you miss one of them, the Charge will not be created.
To add a new, one-off Charge for an existing Customer, go here.
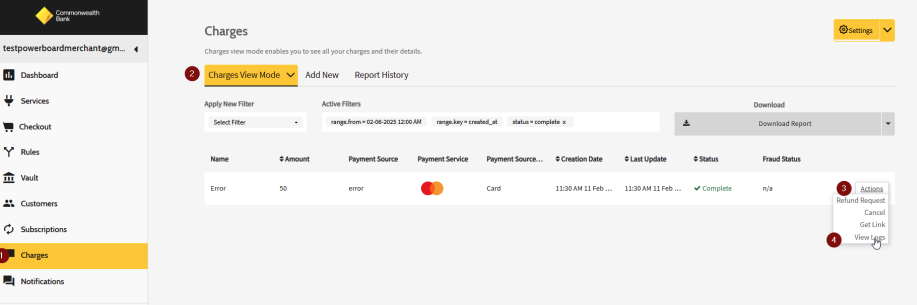
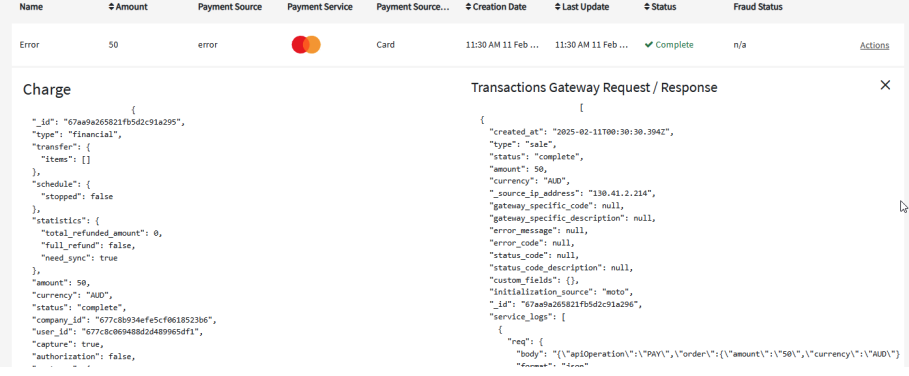
View Logs
Logs can be used to
- View request and response data for any transaction such as initialisation source, payment type, status, processed at time etc.
- View the decline reasons for a failed transaction.
To view logs for an existing Charge:
- Go to Charges > View Mode > Actions > View logs for the specific transaction.
Payment refund
Payment refund is the process of transferring funds from your company account back to the customer. The funds will be returned to the payment method the payer used in the goods/service purchase. Refunds are linked to charge ID. We recommend associating the refund with its original charge, thus providing visibility to the Issuing Bank and the card schemes.
Refunds could be fully or partially refunded. A full refund equals 100% of the amount. A partial refund equals an amount up to the net.
Multiple refunds are allowed up to the full net amount that has been reached.
Refund for an existing Charge
To process a Refund for an existing Charge:
- Go to Charges > View Mode > Actions > Refund Request for the specified Authorisation. You can use the filter option or browse the list.
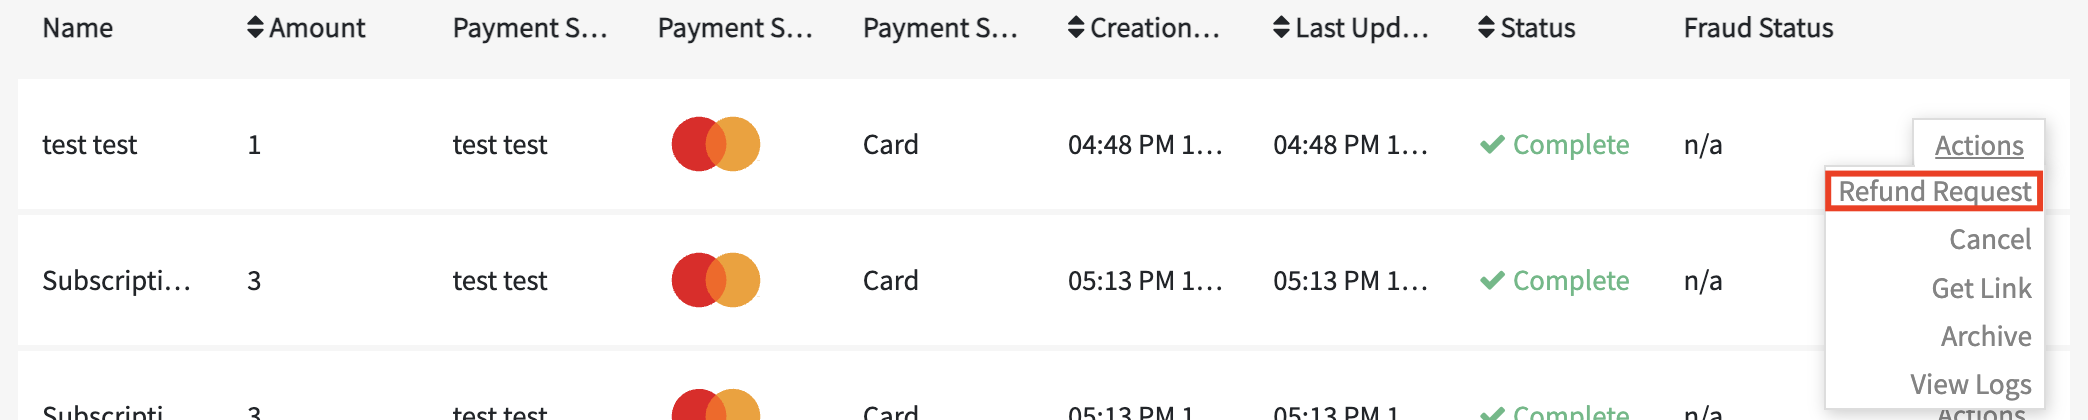
- Enter the amount you would like to refund. It can be either equal to or less than the original amount.
- Click Refund.
Payment Authorisation
Payment Authorisation is a process which guarantees evidence that the customer’s account is valid and offers enough funds to cover the transaction. Card authorisation specifically involves contacting the payment system and blocking the required funds against the credit card. But more than that, the process is a security measure providing card issuers and businesses with a systematic way to screen for potential fraud before it becomes a successful transaction.
Add new Authorisation
To add a new Authorisation:
- Go to Charges > Add New.
- Under the Select Payment type drop-down list, select Pre-Auth.
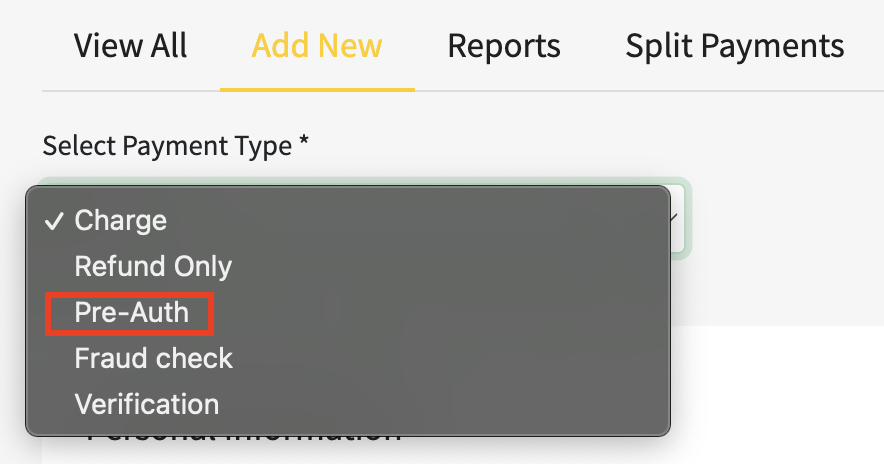
- Complete the Customer’s Personal Information, Address, Payment Details and Payment Information.
- Click Create Authorisation.
NoteEvery Service has a set of required fields. If you miss one of them, the Authorisation will not be created.
Capture Authorisation
Payment capture is the process of finalising a transaction by settling the funds after a successful authorisation (in other words, a pending payment becomes completed). During authorisation, the money doesn’t move, it happens during capture. The payment gateway submits the capture request to the issuing bank immediately or at your chosen time.
To process funds from the customer’s account:
- Go to Charges > View Mode > Actions > Capture for the specified Authorisation. You can use the filter option or browse the list.
- (For Multiple captures) Input the Amount and confirm with Capture.
- Check the transaction in View Logs.
NoteThe total amount of all captures should not exceed the total amount of the authorised charge and can only process one capture for one preauthorisation.
Cancel Authorisation
Payment authorisation cancellation releases the hold over the customer’s account funds. You can cancel the authorisation on a payment that has not yet been captured. It can take up to 7 business days for the cancelled Authorisation to reflect on the customer’s account. This timeframe is dependent on the Payment Service Provider.
To cancel Authorisation:
Go to Charges > View Mode > Actions > Cancel for the specified authorisation. You can use the filter option or browse the list.
Verification
Verification is similar to Authorisation but it is a zero-value Authorisation. It is a practice where Zero value is temporarily processed to verify the validity of a payment card before the actual purchase or service usage.
To add a new verification:
- Go to Charges > Add New.
- Under the Select Payment type drop-down list, select Verification.
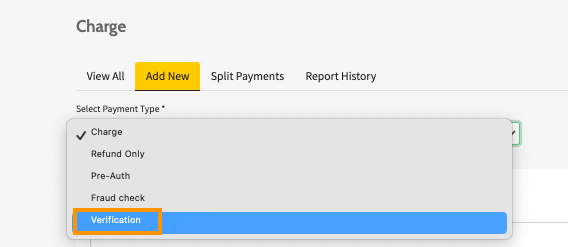
NoteAs soon as you select the verification payment type, the amount will pre fill as $0.
- Complete the Customer’s Personal Information, Address, Payment Details and Payment Information.
- Click Create Verification charge.
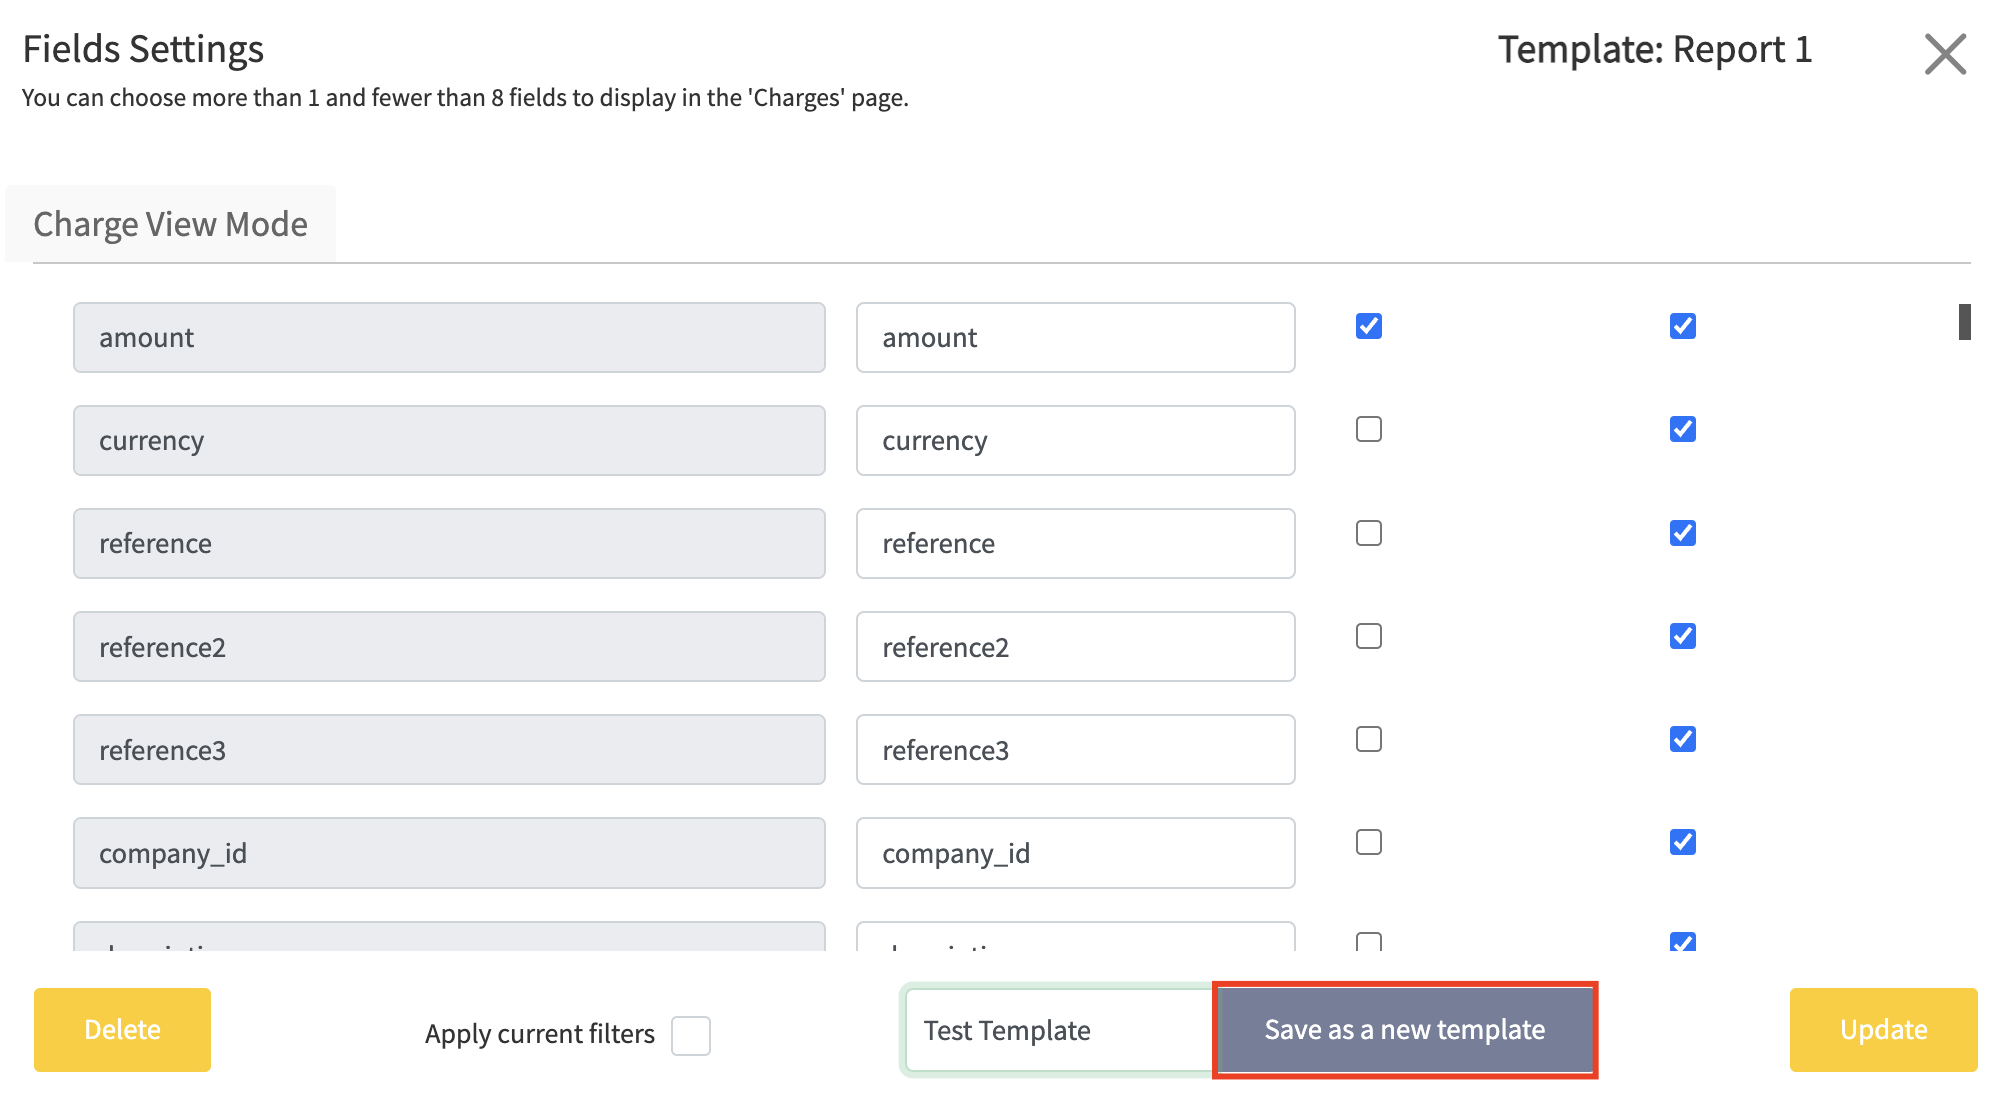
Custom Templates
The options for viewing charges and transactions in the dashboard or CSV files are default charge, default txns (=Transactions), or custom templates. A custom template allows the integration of selected pre-defined fields and filters on the charges/transactions page.
Here are the functions for managing custom templates:
- Field name - predefined Charges or Txns name fields.
- Label - a custom title for the Field Name.
- Display in the Charges page - add up to 8 fields to the Charges or Txns page.
- Display in the CSV export - add an unlimited number of fields to the report in CSV format.
- Delete - remove the template.
- Apply current filters - save the applied search filters to the template.
- Template name - the name of the new template.
- Save as a new template - save the changes in a new template with a new name.
- Update - edit the template.
Add new Custom Templates
To add a Custom Template with specific filtering parameters:
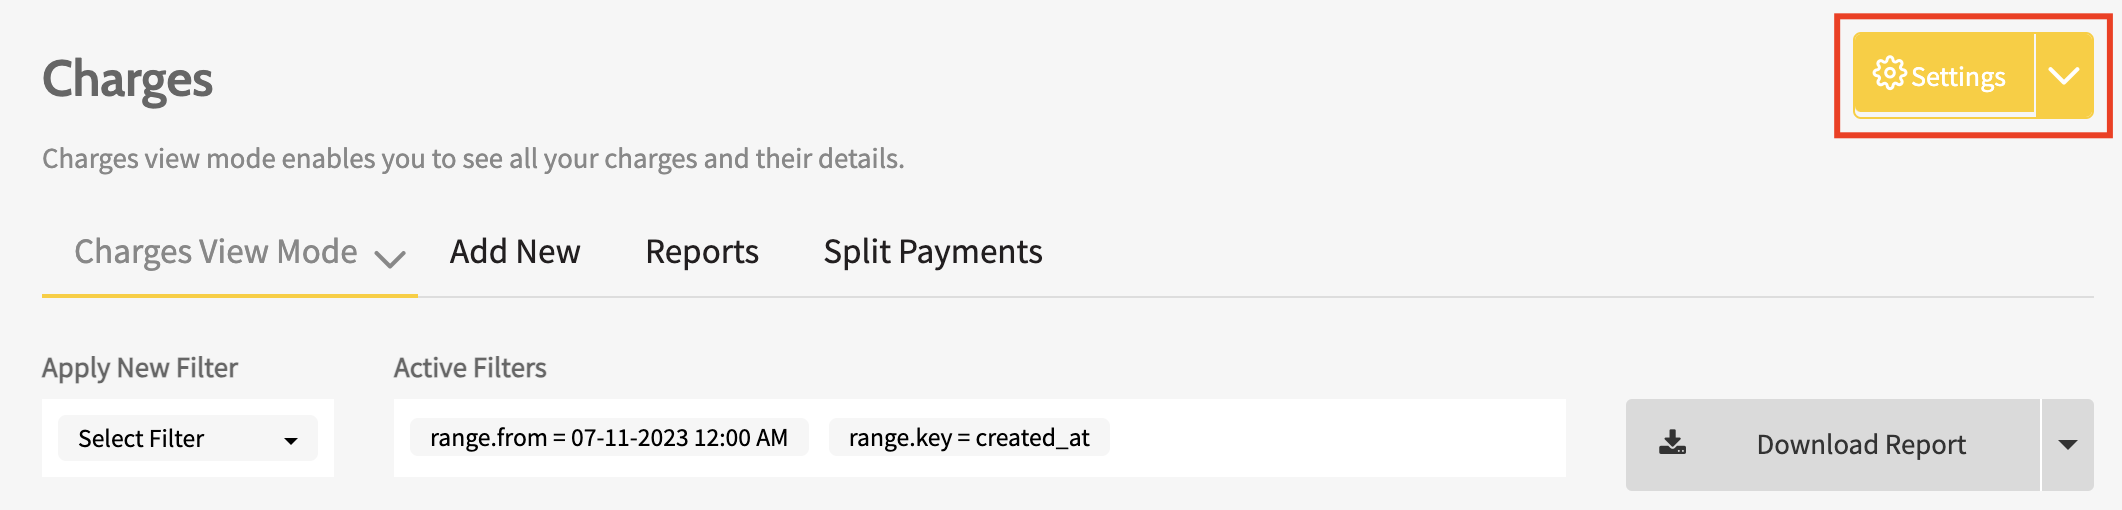
- Go to Charges > View Mode > Settings in the upper right corner.
- Select Fields by checking the Display in the Charges page or Display in the CSV export. It’s optional to change Label names. You can only select maximum of 8 fields under ‘Display in charge page’ or ‘Display in Txns page’ section.
- Hover over a field and drag up or down to change the order in the template.
- Insert the Template Name.
- Click Save as a New Template.
Apply Current Filters Custom Templates
This feature will automatically display the saved custom template fields and search filters when you open the ‘Charges ‘ section.
To save the search filtering parameters to a Custom Template:
- Go to Charges > View Mode > Apply New Filter.
- Select the desired Filters and press Apply Filter.
- Click on the arrow next to Settings in the upper right corner.
- Choose a Template from the dropdown menu.
- Press Settings.
- Select Apply current filters.
- Click Update.

Update Custom Templates
To update a Custom Template:
- Go to Charges > View Mode.
- Press on the arrow next to Settings in the upper right corner.
- Choose Template from the dropdown menu.
- Click Settings.
- Select the Fields by checking the Display in the Charges page or Display in the CSV export. It’s optional to change Label names.
- Hover over a Field and drag up or down to change the order in the template.
- Click Update.

Delete Custom Templates
To delete a Custom Template:
- Go to Charges > View Mode > arrow next to Settings in the upper right corner.
- Choose Template from the dropdown menu.
- Press Settings.
- Click Delete.

FAQs
You can view all the refunds that has been completed through the Transaction view mode. Click on Charges> Charges View Mode> TXNS View Mode
Updated 4 months ago