
Rules
The Reject Rules allow you to prioritise transaction flows such as certain payment
methods, currencies, or card schemes over others. You can reject certain transactions if
they do not meet your criteria and ask the customer to try a different method instead.
A Reject Rule can be used in a scenario where a transaction can be prevented using
different criteria such as PAN or Country. This will allow merchants to block certain cards
and Countries.
The Rules feature uses Boolean logic to implement your preferences.
Creating a new Reject Rule
To add a Rule, follow these steps:
-
Log into your PowerBoard account.
-
Navigate to Rules from the menu on the left and make sure you are in the Charge
Reject tab. -
Choose the Add New button.
-
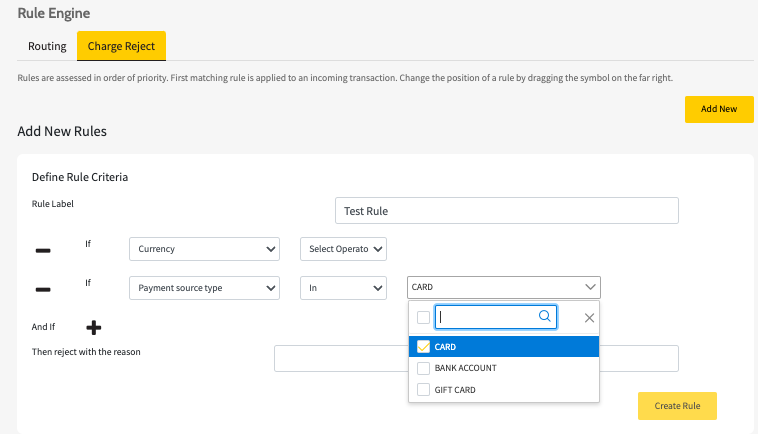
Add the Rule Label to name the new Rule.
-
You can select the Rule Type by choosing between Currency, Amount and Payment
Source Type.-
A Rule Label name can be used to provide a name to the Reject rule. Simply fill in the
details text box.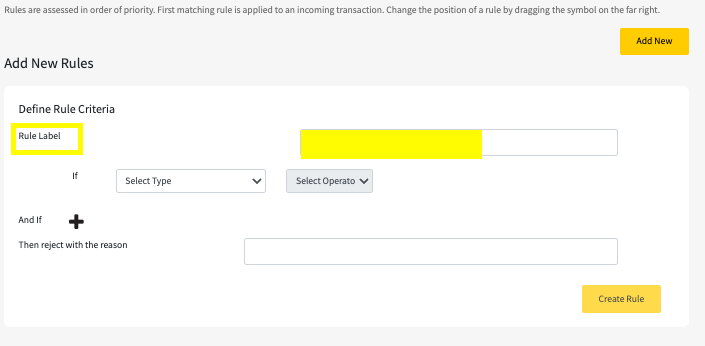
-
Click Select Type and then use options from the drop-down menu to create the criteria for
a Reject rule.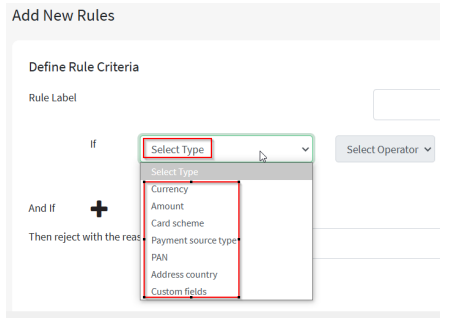
-
More options can be chosen to broaden the Reject Rule criteria.
-
-
Choose a Rule Operator from the ones described below:
- Less than: the rule applies to the value less than selected value.
- Greater than: the rule applies to the value greater to the selected value.
- Greater than or equal: the rule applies to the value greater or equal to the selected value.
- Less than or equal: the rule applies to the value less or equal to the selected value.
- In: choose several options, for which the rule will be applied.
- Not in: choose several options, for which the rule will not be applied.
-
Select the Reject Reason you would like to reject the payment for with reason.
-
Click on the Create Rule button to add the new Rule to the list.

NoteDo not forget to Activate the Reject Rule as it's created Inactive by default.
Activate or deactivate existing Charge Reject Rules
To activate or deactivate an existing Rule, follow these steps:
-
Log into your PowerBoard account.
-
Navigate to Rules from the menu on the left and make sure you are in the Charge
Reject tab. -
Click on the Actions button on the required Rule;
-
Choose the Activate/Deactivate Rule option from the drop-down.

Check A Rule
You can test that your Rules are working as intended, before enabling them on your account, by
following these steps:
-
Log into your PowerBoard account.
-
Navigate to Rules from the menu on the left and make sure you are in the **Charge
Reject **tab. -
Find the Check A Rule section at the bottom page.
-
Choose Currency, Payment type, Amount and PAN (card number) for checking the
rule. -
Click the Check Rule button. This will only check the active rules which are
configured on their account previously. The result is then displayed on the screen.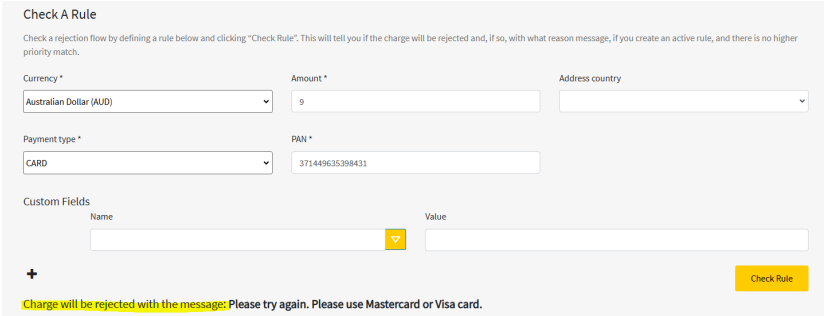
In this example the customer will be asked to try again with a Mastercard or Visa as the Reject Rule was created for AMEX card scheme and Amount as criteria.
Priority setting of multiple Rules
This feature allows you to change the prioritisation of Rules if there are more than one, simply follow
these steps:
-
Log into your PowerBoard account.
-
Navigate to Rules from the menu on the left and make sure you are in the Charge Reject tab.
-
Drag the rule using the rule itself button to the desired position.
Your rules will be processed according to this order.
Updated 4 months ago