
Users
A User has a user account and is identified in the platform by a username and a password. By default, the only available role is admin. Assign custom roles to new users and control their access capabilities.
Users can be viewed and updated from the Profile Menu. Go to the top corner of the dashboard's left-hand side. Click on your name to expand the list of options.
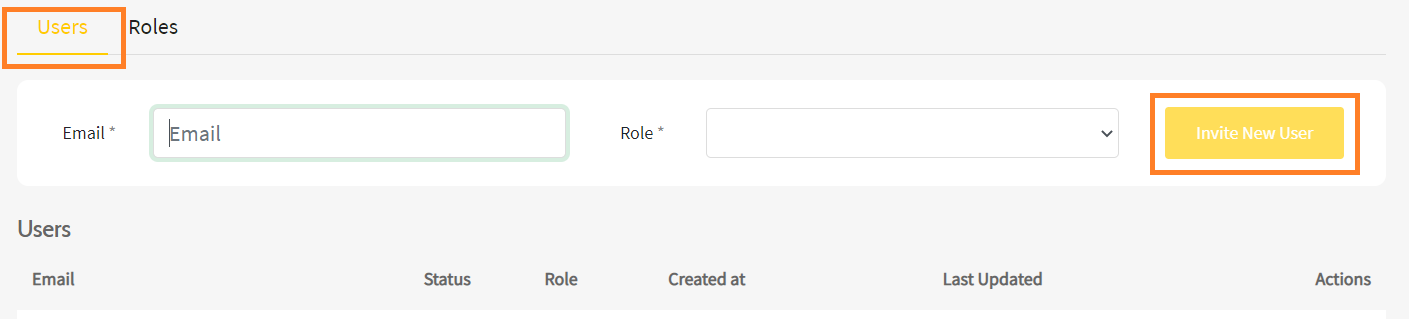
Invite New User
-
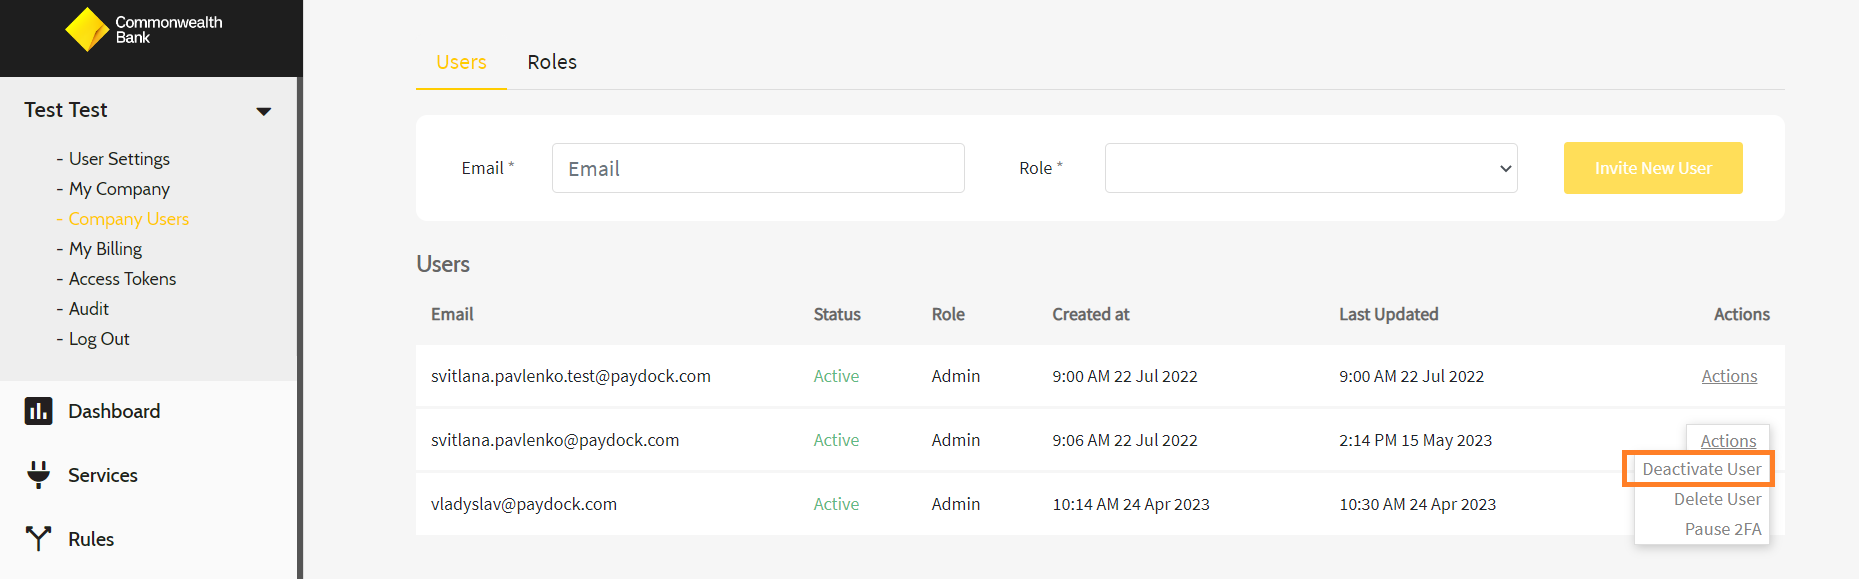
Go to Profile menu > Company Users > Users.
-
Add the new User's Email and assign a Role.
-
OPTIONAL: If you would like to limit the user to specific IP addresses you can utilise the Allowlist IPs option to enter the whitelisted IP addresses or IP ranges of the users.

-
Press Invite New User.
New users receive a welcome email with an invitation link, prompting them to create a password. The link expires after 72 hours. Once the change window is inactive, the admin can re-send the invitation. Alternatively, obstruct the new user's access by deactivating the link.
NoteUnique email addresses must be used for creating Users, i.e., emails not assigned to other Users or Merchants.
Resend a new User email invitation
- Go to Profile menu > Company Users > Users > Actions > Resend Invitation for the specified User.
- Click Confirm.

NoteUnique email addresses must be used for creating Users, i.e., emails not assigned to other Users or Merchants.
Deactivate a new User email invitation
- Go to Profile menu > Company Users> Users > Actions > Deactivate Invitation for the specified User.
- Click Confirm.
Pause 2FA
By pausing 2FA, the user’s current 2FA token will become invalid, then in the next login attempt user will be able to set a new 2FA token.
- Go to Profile menu > Company Users> Users > Actions > Pause 2FA for the specified User.
- Click Confirm.
NoteOwner user’s 2FA can’t be paused via dashboard. To pause owner user’s 2FA please reach out to PowerBoard merchant support.
Edit Users
To change a User’s permission capabilities:
- Go to Profile menu > Company Users > Users > Actions > Edit Role for the specified User.
- Assign a new User Role from the drop-down menu.
- Check the permissions with View Permissions. Press the + sign to expand the permissions set for a particular section for a more granular view. Select Close.
- Click Accept.
NoteFor permissions related with each role please refer to table under Roles and Permissions section.
Deactivate Users
NoteBy deactivating you will temporarily pause user’s access, you can re-active their access later if required. If you wish to permanently remove user’s access, please refer to “Delete Users”.
To temporarily remove access to your account for a particular User:
- Go to Profile menu > Company Users > Users > Actions > Deactivate User for the specified User.
- Confirm with OK.
Delete Users:
- Go to Profile menu > Company Users > Users > Actions > Delete User for the specifiedUser.
- Confirm with OK.
Activate Users
To re-activate access to your account for a certain User:
- Go to Profile menu > Company Users > Users > Actions > Activate User for the specified User.
- Confirm with OK.
Roles and Permissions
Roles and Permission Policies settings under Company User can’t be changed.
Please see below table for permissions related with each role:
PowerBoard User Role matrix
| Permissions/Roles | SM_Admin | SM_Manager | SM_Customer Support | SM_Reporting |
|---|---|---|---|---|
| Dashboard | Access | Access | Access | Access |
| Services | Create Delete Modify Search | Search | Search | No access |
| Rules | Create Modify Search | Search | Search | No access |
| Vault | Search Update Delete | Search Update Delete | Search Update Delete | Search |
| Customers | Create Modify Delete Search Details and Payment sources | Create Modify Delete Search Details and Payment sources | Create Modify Delete Search Details and Payment source | Search details Search payment sources |
| Subscriptions | Search Search by customer Create Modify Delete | Search Search by customer Create Modify Delete | Search Search by customer Create Modify Delete | Search Search by customer |
| Charges | Create charge Pre auth Refund Capture Search | Create charge Pre auth Refund Capture Search | Create charge Pre auth Refund Capture Search | Search |
| Notifications | Create notifications/ Templates Modify notifications/ Templates Delete notifications/Templates Search Templates Search logs Resend notifications Delete logs | Create notifications/ Templates Modify notifications/ Templates Delete notifications/Templates Search Templates Search logs Resend notifications Delete logs | Search logs Resend notifications Delete logs | Search logs |
| Users | Search Create Activate Deactivate Search invitations Resend/ Deactivate/ Accept invitations Pause TFA | Search Create Activate Deactivate Search invitations Resend/ Deactivate/ Accept invitations | Search Accept invitation | Search Accept invitation |
| Access Tokens | Create Search Pause/ Reactive Give permissions Delete Reset | Search | Search | No access |
FAQs
Only the "SM_Admin" has the authority/ permission to change the user roles of any other existing user accounts. But the Administrators cannot change the user role for first administrator created for the account.
1. Check if the invitation is still valid as it will automatically expire after 72 hours, and resend the link if it’s expired.
2. If the link is still valid and user didn’t receive it in mailbox, please try resending the invitation link. If still couldn’t receive please troubleshoot following below steps:
- Whitelisted the email address "[email protected]."
- Added the domain "@powerboard.cba.com.au" to their allow list.
- Check your DNS configuration. Ensure that it's correctly set up to receive emails especially from powerboard.cba.com.au. Also, check if the cba domain is blacklisted using online tools that provide blacklisting information.
- On the domain configurations settings, the domain powerboard.cba.com.au might be on a blacklist due to previous abuse or suspicious activity, causing receiving email servers to reject emails from it.
- Review DNS config and update the DMARC Quarantine/Reject policy.
- Ensure there are no strict rules applied for the domain -powerboard.cba.com.au.
If the issue persists after performing above steps, please reach out to PowerBoard Merchant Support.
Updated 4 months ago