Configuration
Learn how to configure the Powerboard Extension within the Magento Dashboard
Once you have installed the PowerBoard Extension for Magento, you will need to configure the module with your PowerBoard API Keys and enable each payment method you require.
Navigate to the PowerBoard Configuration
-
Login to your Magento admin dashboard
-
Navigate to Stores > Configuration in the left hand dashboard panel
-
Go to Sales > Payment Methods

Configuring the PowerBoard Extension
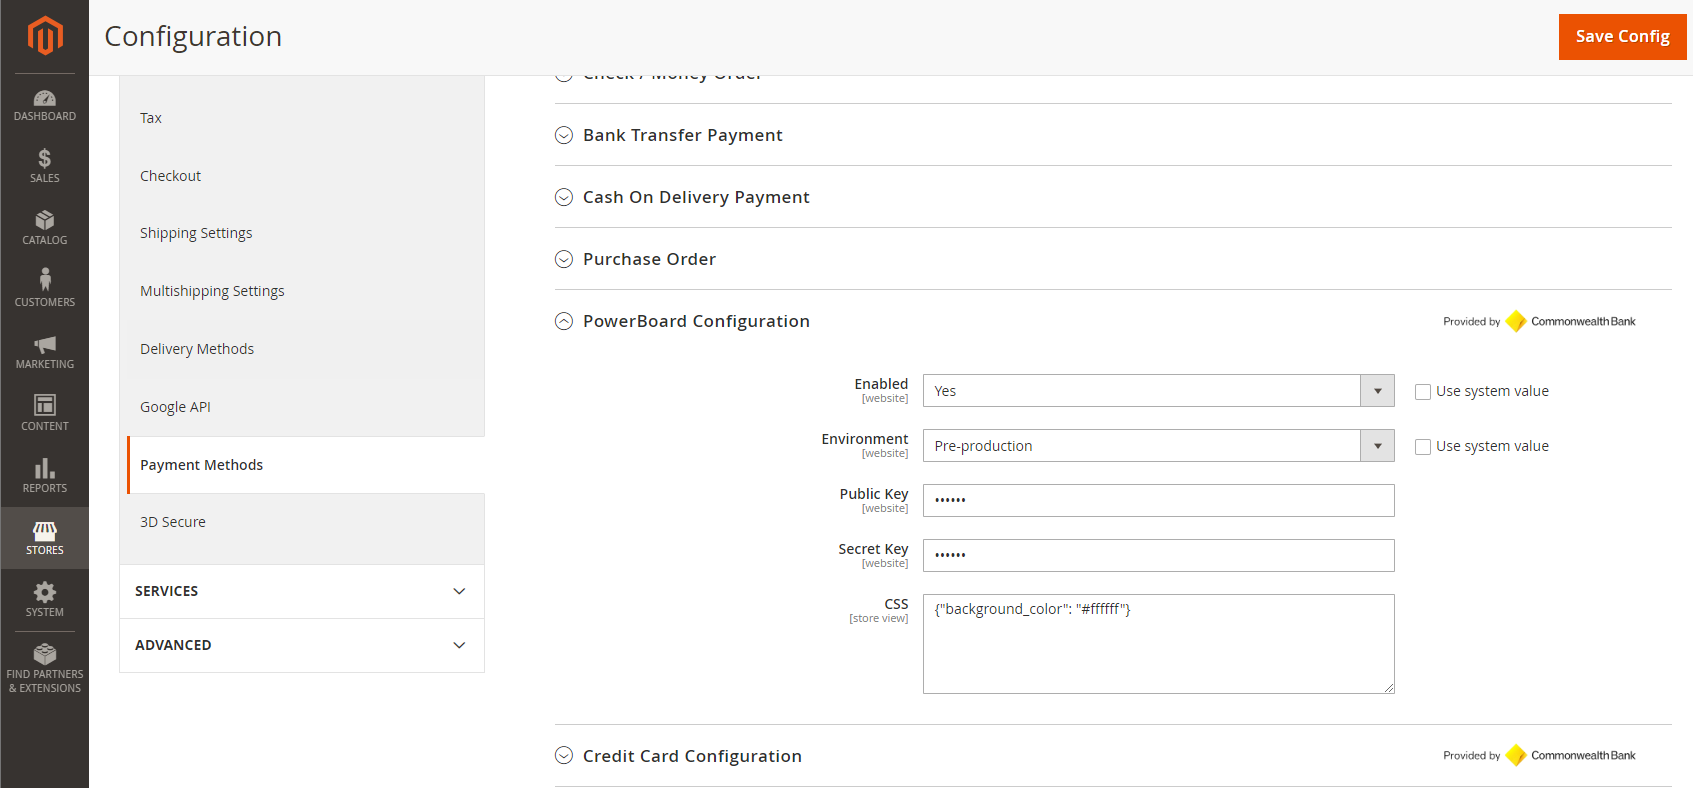
PowerBoard Configuration - General Settings
You will require a PowerBoard Access Token to configure the plugin.
Use the PowerBoard dashboard to create your API Access token:
- Navigate to Access Tokens link in the navigation dropdown
- Click the Create New button
- Select the following permissions:
- widgets: Payment Form Widget
- widgets: Payment Source Preview Widget
- widgets: Zipmoney Checkout Button
- widgets: Paypal Checkout Button
- widgets: Afterpay Checkout Button
- browser API: Search Customers Payment Sources
- browser API: Create Payment Sources Tokens
- charges: Create Charge
- charges: check 3ds charge
- charges:Refund Charge
- charges: Search Charge
- charges: Create wallet charge for later capture
- charges: wallet initialised charge manual abandon
- charges: process charge
- charges: capture charge
- charges: get charge by charge id
- charges: refund transaction
- customers: create customer
- customers: modify customer
- customers: search customers
- customers: get customer
- customers payment sources: search customer payment sources
- customers payment sources: modify customer payment source
- payment sources tokens
- payment sources vault: create payment source vault
- payment sources external checkout
- Click Save. Ensure to save the Access token as you will not be able to access it.
.

PowerBoard Extension General Configuration
| Setting Name | Description |
|---|---|
| Enabled (Yes/No) | Enable or disable PowerBoard from being available both on the frontend (customer facing) and backend (merchant facing). |
| Environment (pre-production or production) | The PowerBoard environment. Pre-production for testing. |
| API Access token | Obtained from PowerBoard Merchant Portal > Access Tokens |
| CSS | Additional styling that will be applied to the PowerBoard widgets/payment form in the checkout. Default: {"background_color": "#ffffff"} |
| Auto Refund Failures | This will automatically refund a wallet charge if an order fails to process after charging the customer. |
| Debug Logging | This will perform extensive logging if enabled. It should only be enabled if you're experiencing issues and need verbose logging. |
Credit Card Configuration
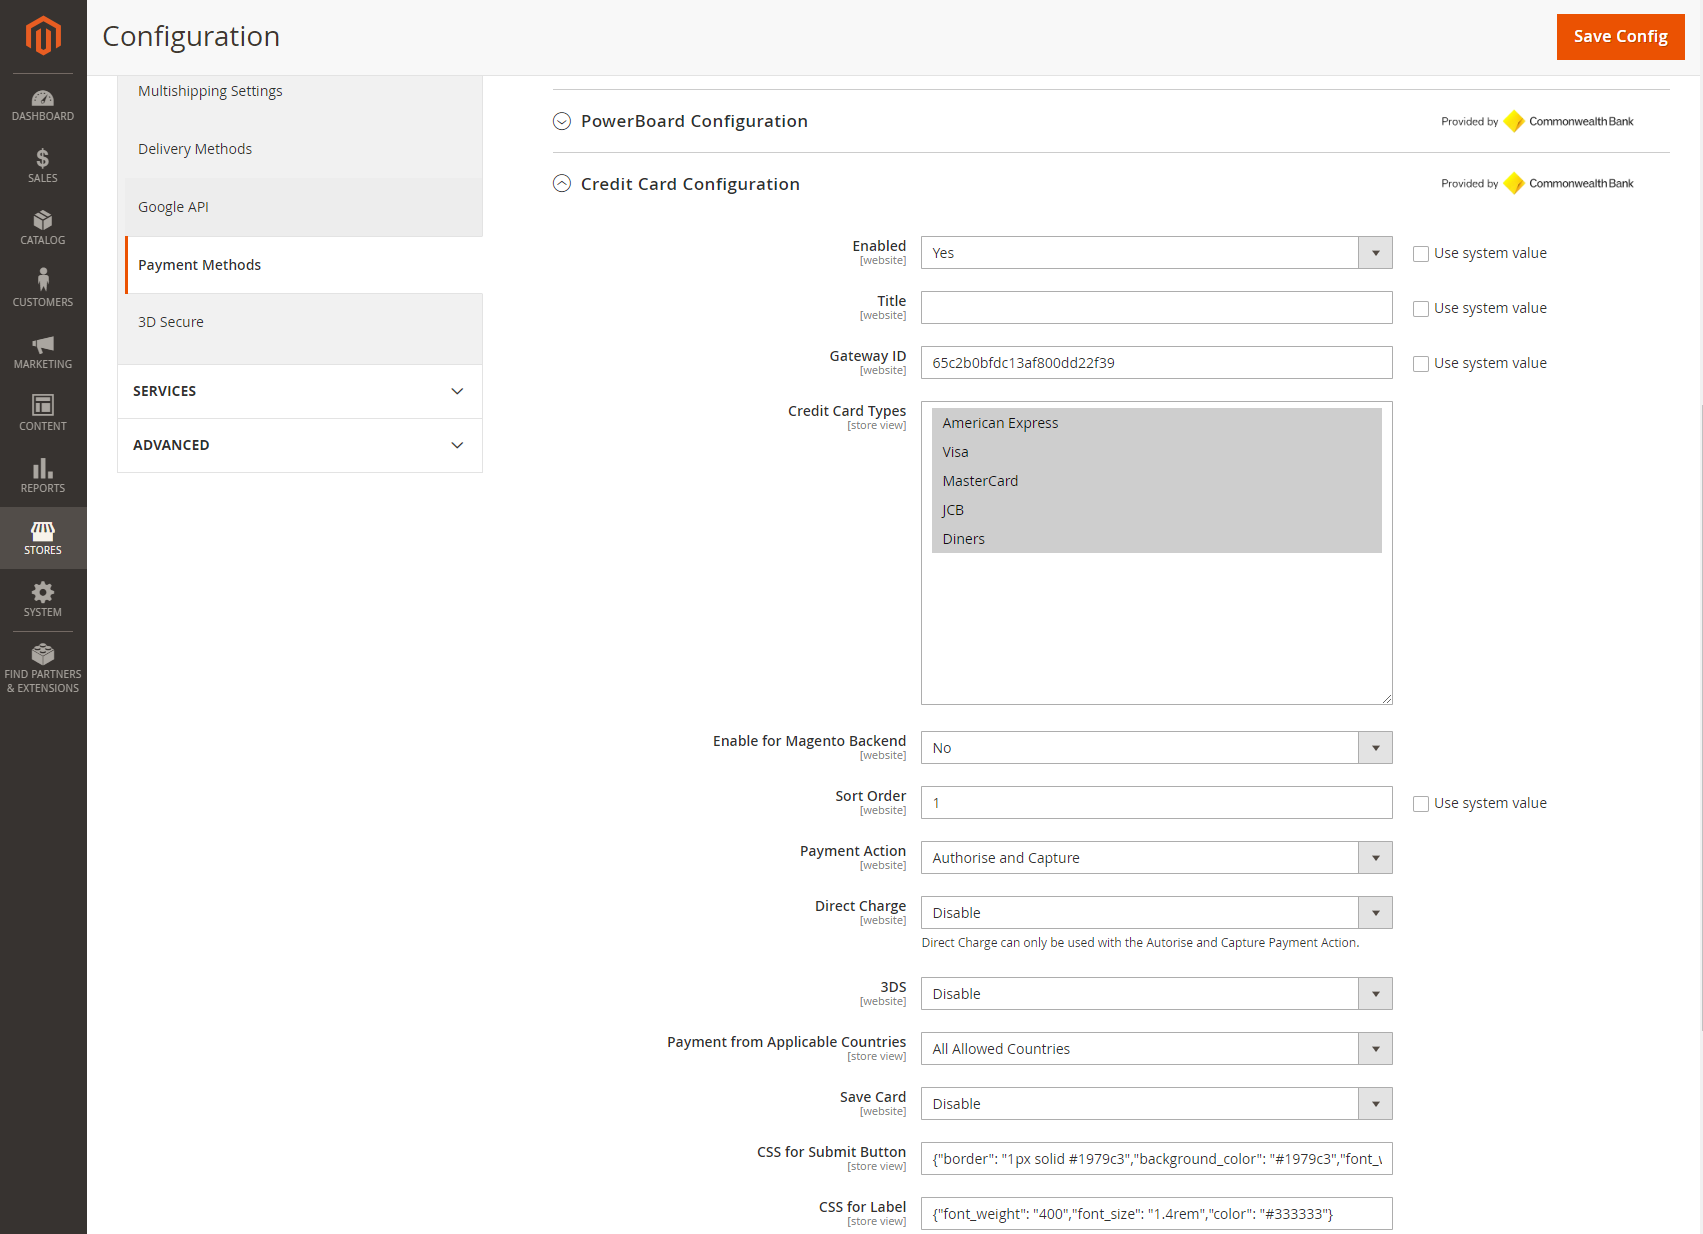
Enable Credit Card Configuration to display Card Payments on your Magento Environment. Supports all card types available within PowerBoard, 3D Secure 2.0 and Tokenisation (Save card) features.

PowerBoard Card Payments Configuration
Configurable Settings:
| Setting Name | Description |
|---|---|
| Enabled (Yes/No) | Enable or disable Credit Card as a payment option via PowerBoard. |
| Title | The title that appears for this payment option at checkout. |
| Gateway ID | Gateway ID for Credit Card obtained from PowerBoard Merchant Portal > Services. (Required) |
| Credit Card Type | Choose which of the Credit Card type scheme logos will be displayed within the Credit Card payment option. |
| Enable for Magento Backend (yes/no) | Enable the use of this payment option to create orders in backend (merchant facing) system. |
| Sort Order | Position of the payment selector within the list of PowerBoard payment methods (lowest number first) |
| 3DS | Enabling this setting will enable 3D Secure in the checkout workflow. |
| Save Card (yes/no) | Allow logged in customers to save their credit card for later use. |
| Widget CSS Configuration > Submit button | Additional styling for the credit card form submit button. Default: {"font_weight": "500", "line_height": "2.8rem", "font_size": "1.8rem", "border_radius": "3px"} |
| Widget CSS Configuration > Label | Additional styling for the credit card form labels. Default: {"font_weight": "400"} |
| Widget CSS Configuration > Input | Additional styling for the credit card form fields. Default: {"font_size": "16px", "height": "32px", "border": "1px solid #c2c2c2", "border_radius": "1px"} |
| Payment From applicable countries | Select the countries allowed to use this payment. |
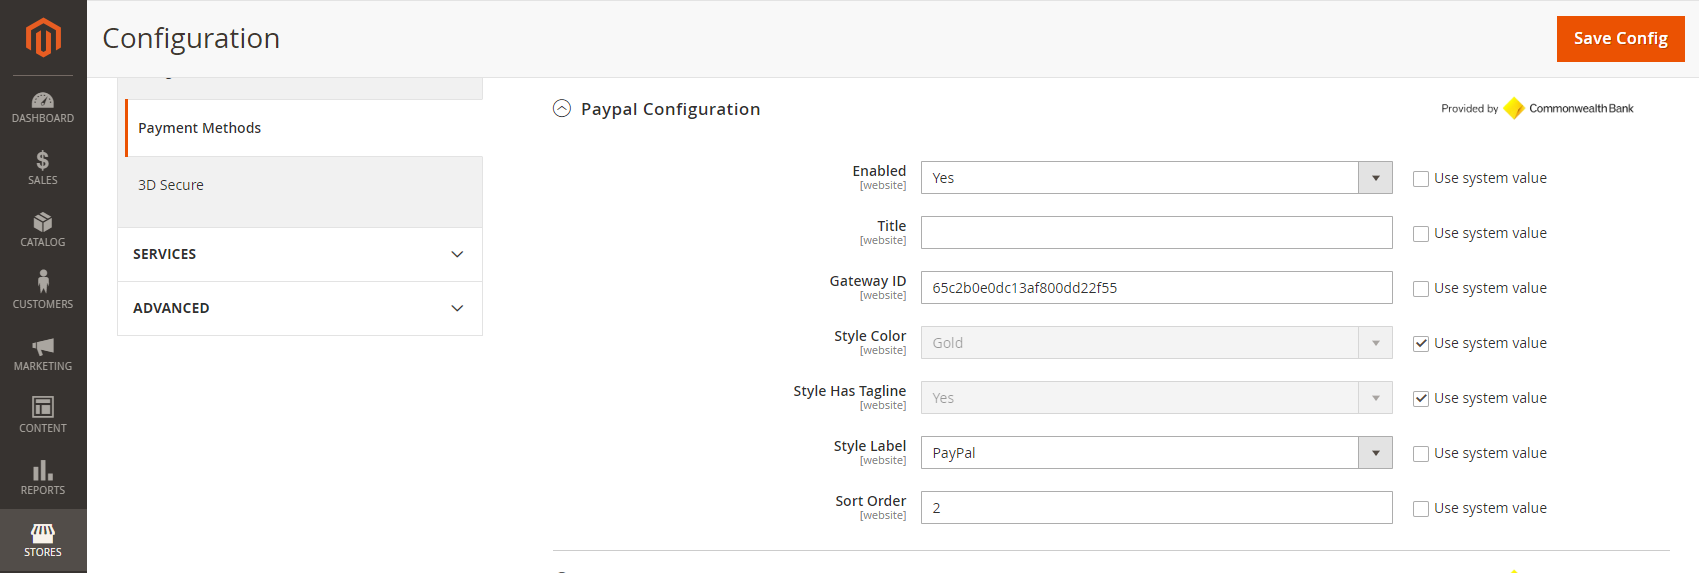
Paypal Configuration
Important
You must setup your PayPal account in PowerBoard. Follow instruction here to add a PayPal service.

| Setting Name | Description |
|---|---|
| Enabled (yes/no) | Enable or disable PayPal as a payment option via PowerBoard. |
| Title | The title that appears for this payment option at checkout. |
| Gateway ID | Gateway ID for Credit Card obtained from PowerBoard Merchant Portal > Services. (Required) |
| Enable Pay Later (yes/no) | Enable or disable PayPal Pay Later feature on payment. |
| Style Layout | How the buttons are aligned (Horizontal or Vertical) when there are more that one button. |
| Style Color | Display colour of payment buttons PayPal’s recommendation in priority: 1. gold 2. blue 3. silver 4. white 5. black |
| Style Shape | Display shape of payment buttons. Paypal’s recommendation in priority: 1. rect 2. pill |
| Style Has Tagline (yes/no) | Choose whether to display the buttons with a tagline “The safer, easier way to pay” underneath. |
| Style Label | Display Label text for button. Options includes:
    |
| Sort Order | Position of the payment selector within the list of PowerBoard payment methods (lowest number first) |
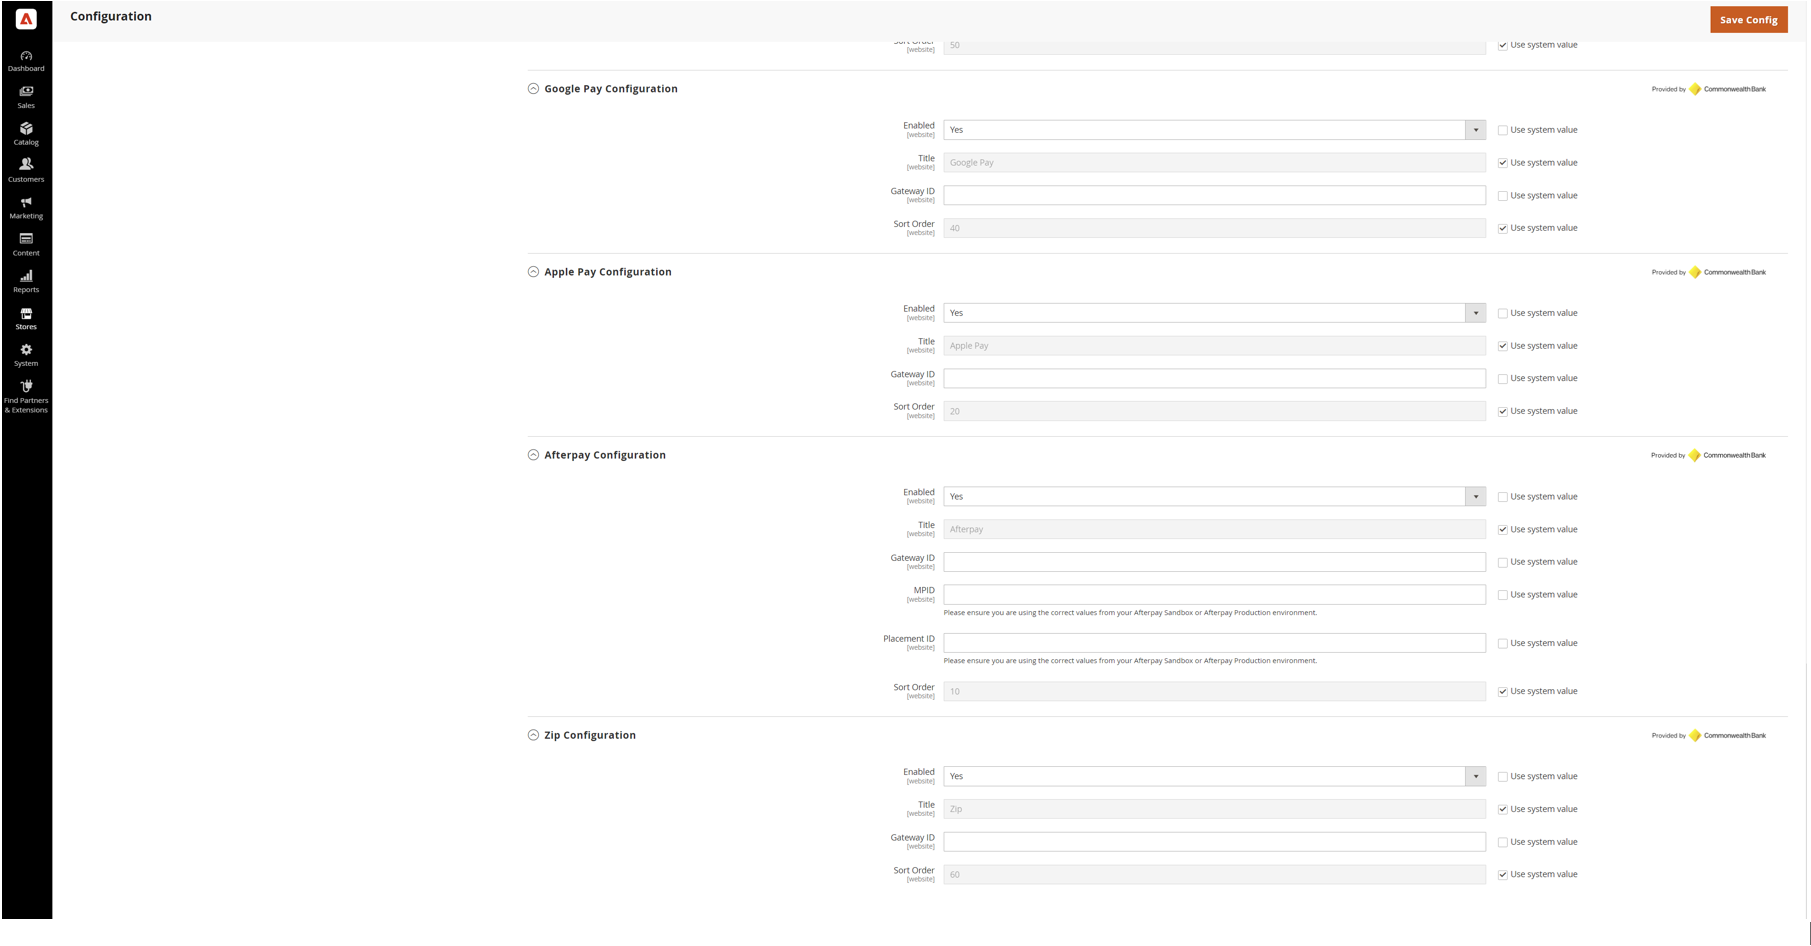
Configuration for Google Pay / Apple Pay / Afterpay / Zip
Important
You must have Afterpay and Zip service setup in your PowerBoard Portal. To add a service please follow this guide.
For Google Pay and Apple Pay, you must enable these services by following these guides: Google Pay | Apple Pay

| Setting Name | Description |
|---|---|
| Enabled (yes/no) | Enable or disable as a payment option via PowerBoard. |
| Title | The title that appears for this payment option at checkout. |
| Gateway ID | Gateway ID obtained from PowerBoard Merchant Portal for respective service. |
| MPID (Afterpay Only) | MPID found in the your afterpay account configuration. Please ensure the appropriate value for sandbox or production environment. |
| Placement ID (Afterpay Only) | Placement ID found in the your afterpay account configuration. Please ensure the appropriate value for sandbox or production environment. |
Checkout View
Once you have enabled all Payment Methods in PowerBoard configuration, your checkout will appear as below:
Updated 8 months ago
