
Payment Workflows
The Architecture page contains a series of diagrams and high level descriptions to provide you with an overview of how the various services and transaction flows function between PowerBoard and merchant environment.
Integration Workflows
Charge creation with OTT
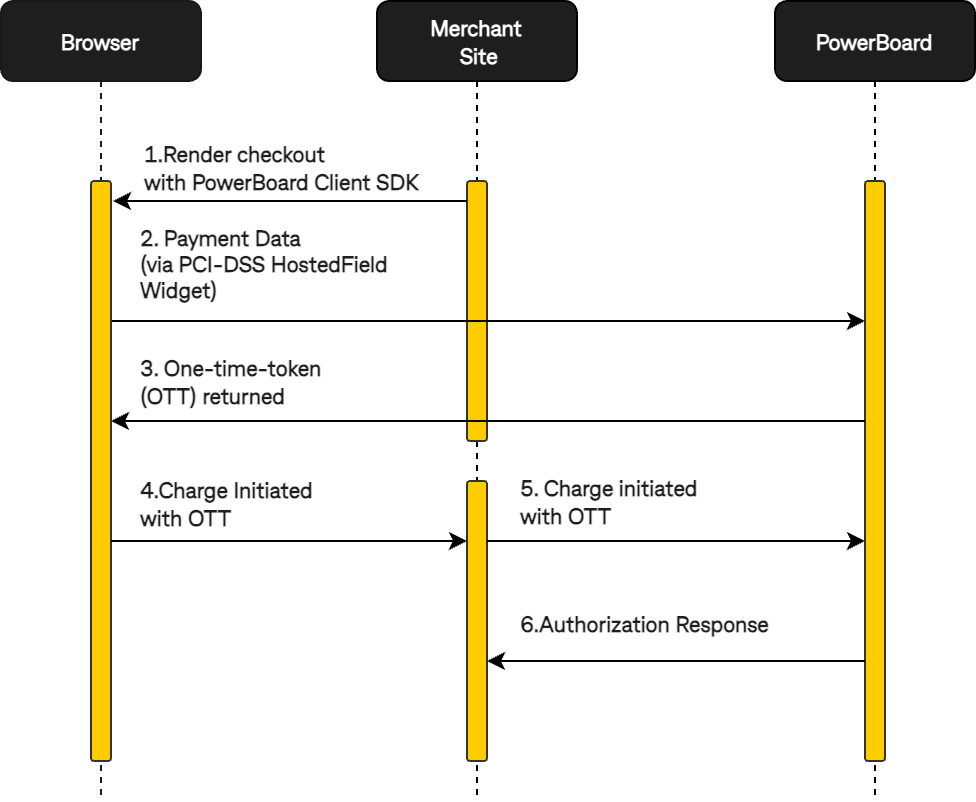
Sequence Diagram
To create a one-time token for the payment flow, the process can be described as follows:
- The Merchant Site utilizes the PowerBoard Client SDK to render the checkout on the Browser.
- The Browser securely sends the Payment Data to PowerBoard through the PCI-DSS HostedField Widget.
- PowerBoard generates a One-time Token (OTT) and returns it to the Browser.
- Using the newly created OTT, the Browser initiates the Charge by sending the payment data to the Merchant Site.
- The Merchant Site gathers all the data received from the Browser and forwards it to PowerBoard for further processing.
- Once processing is complete, PowerBoard shares the Authorization Response with the Merchant Site.
PayPal Smart Button
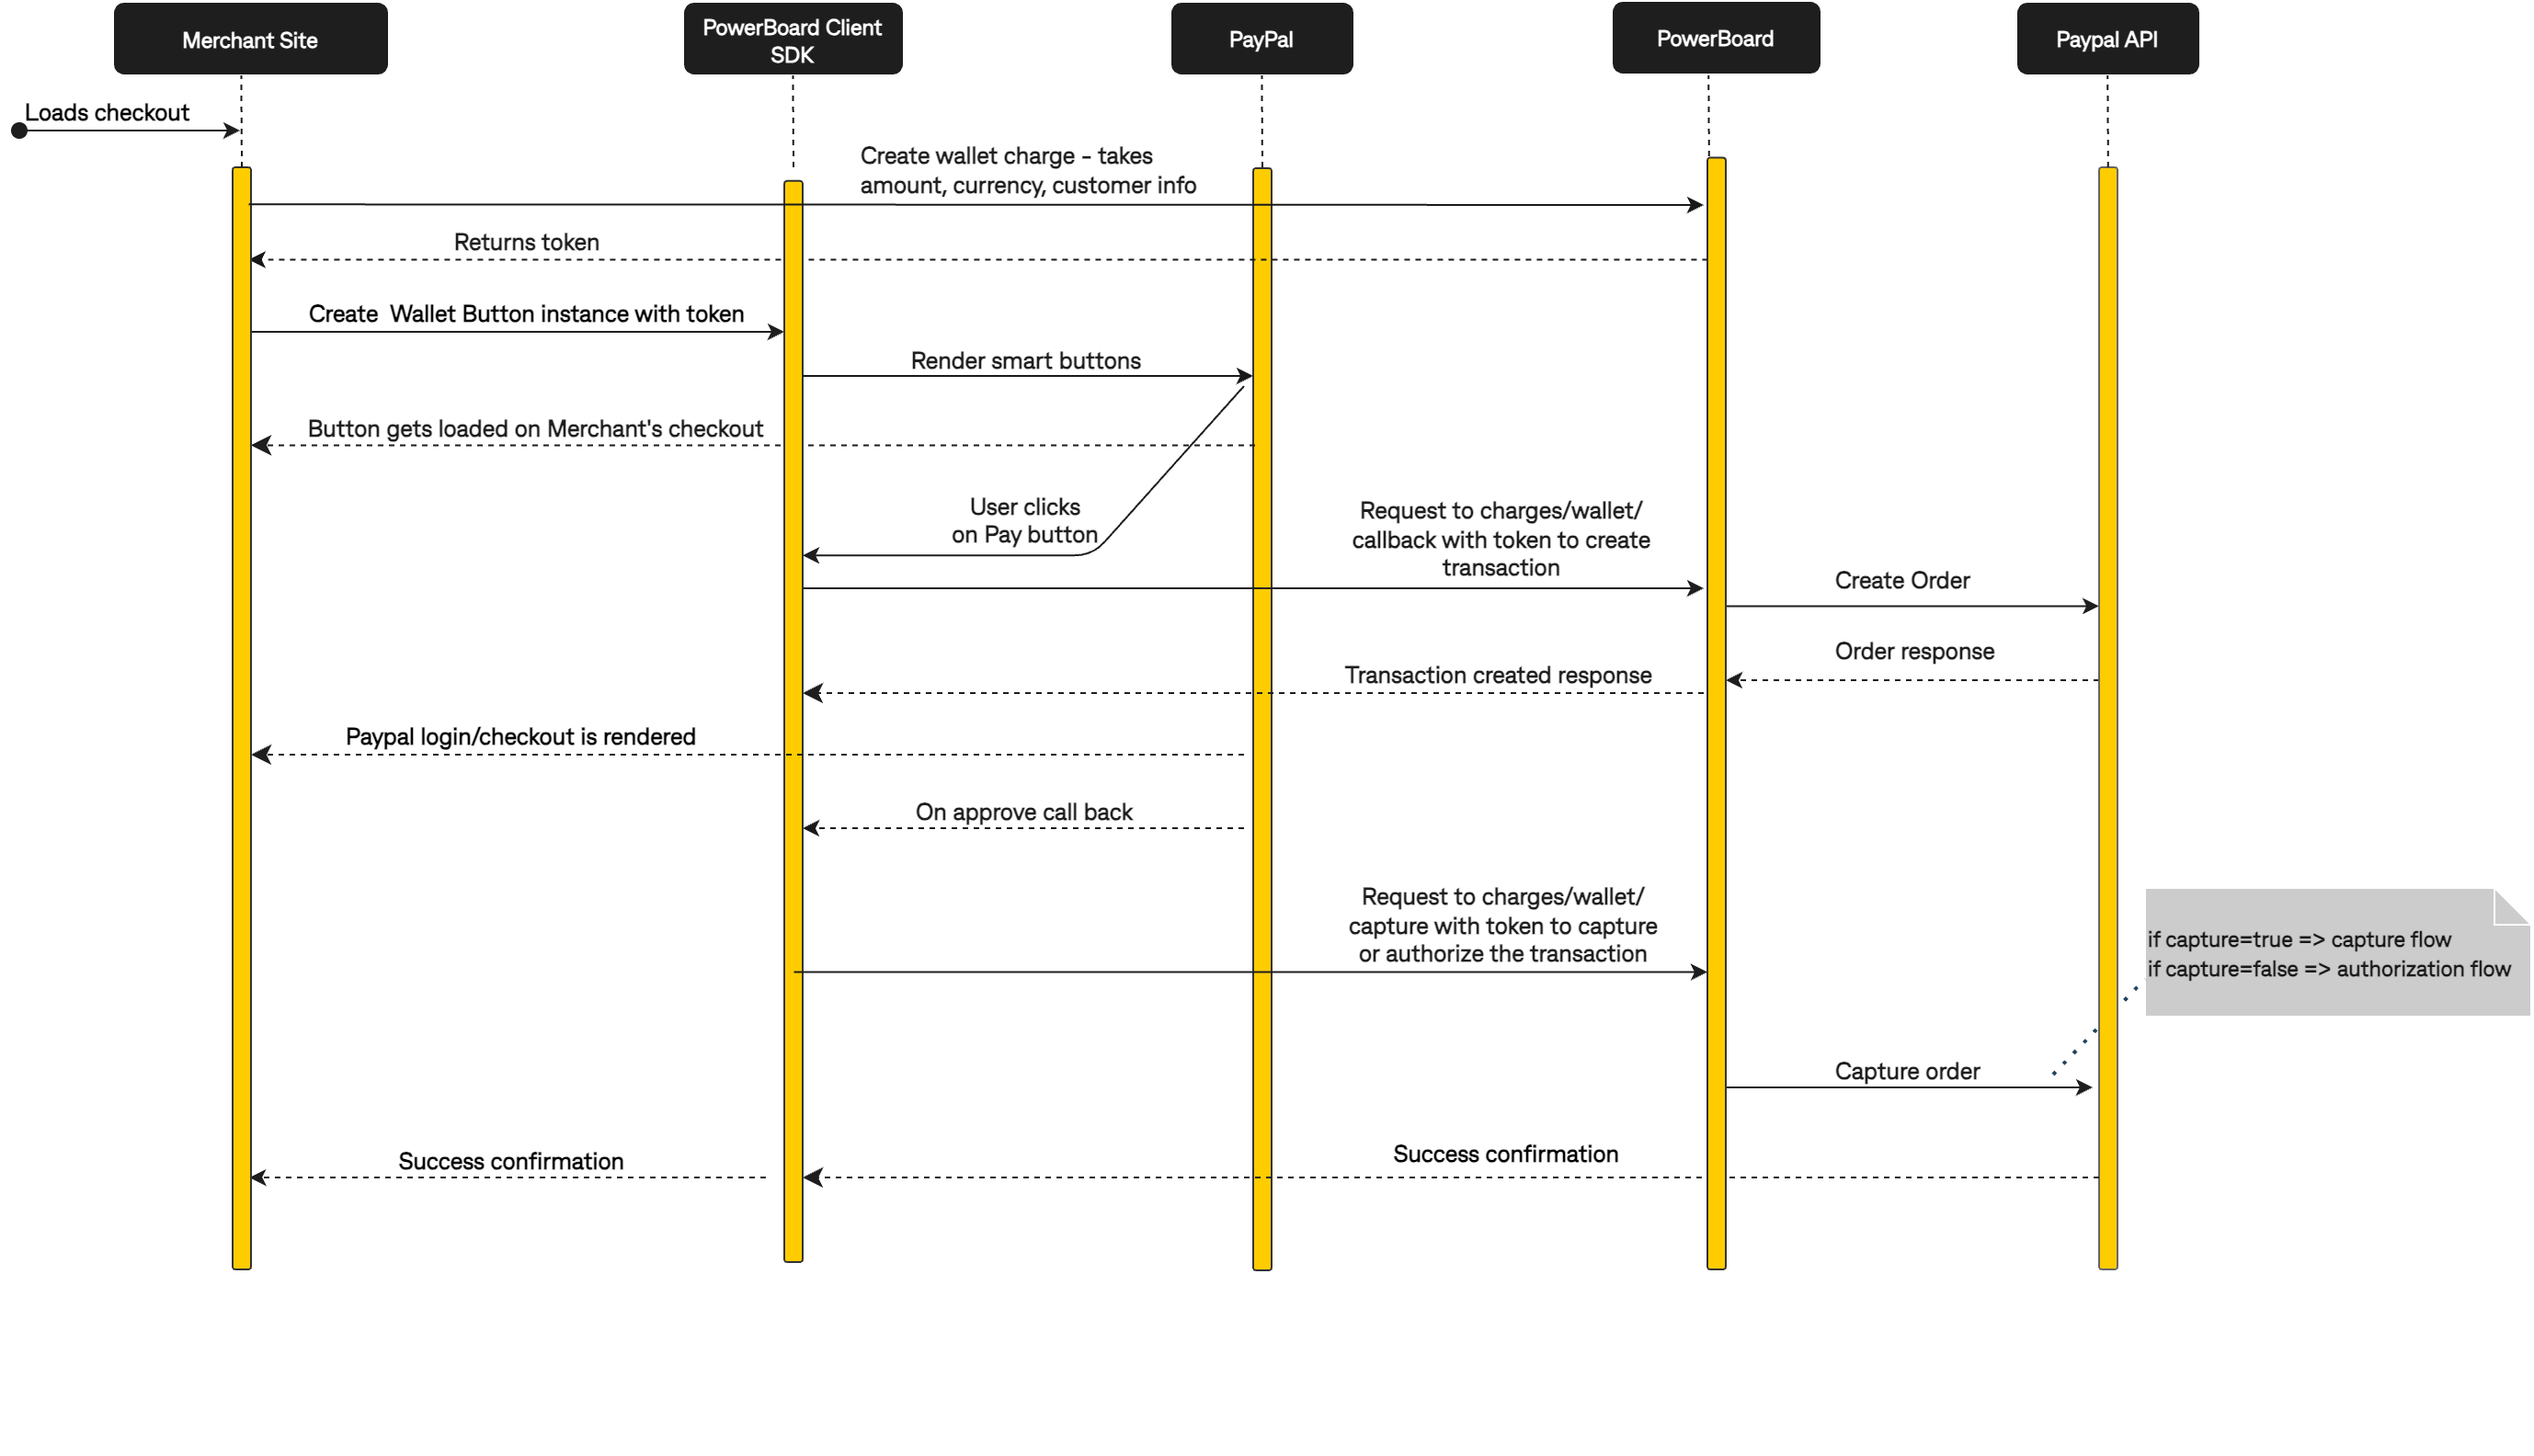
PayPal Sequence Diagram
The steps involved in creating a charge using the Paypal Smart Button can be outlined as follows:
- Upon loading the checkout, the Merchant Site initiates the creation of a wallet charge. It gathers the necessary payment information, such as amount, currency, and customer details, and sends these data to PowerBoard.
- PowerBoard responds by providing a token for creating a wallet button on the Merchant Site.
- The Merchant Site sends a request to the PowerBoard Client SDK, instructing it to create an instance of the Wallet Button using the provided token.
- The PowerBoard Client SDK, in turn, requests Paypal to render the Smart button.
- Once the confirmation is received from Paypal, the button is loaded onto the Merchant's checkout page.
- When a user clicks the Pay button, the PowerBoard Client SDK contacts PowerBoard and requests a transaction using the provided token.
- PowerBoard generates an order creation via the Paypal API.
- The Paypal API sends the order response back to PowerBoard.
- PowerBoard forwards the received transaction-created response to the PowerBoard Client SDK.
- Upon receiving the response, Paypal renders the Paypal login page for the user to proceed with the login process. Simultaneously, Paypal generates an approved callback and sends it to the PowerBoard Client SDK.
- PowerBoard Client SDK requests the PowerBoard to charge/wallet/capture the transaction using the provided token.
- PowerBoard generates a request to capture an order and sends it to the Paypal API.
- The Paypal API determines the appropriate flow for the request. If capture=true, the capture flow is used, and a success confirmation is sent to the PowerBoard Client SDK. If capture=false, the authorization flow is used, and a success confirmation is also sent to the PowerBoard Client SDK.
- After receiving the confirmation, the PowerBoard Client SDK forwards it to the Merchant Site.
Apple Pay
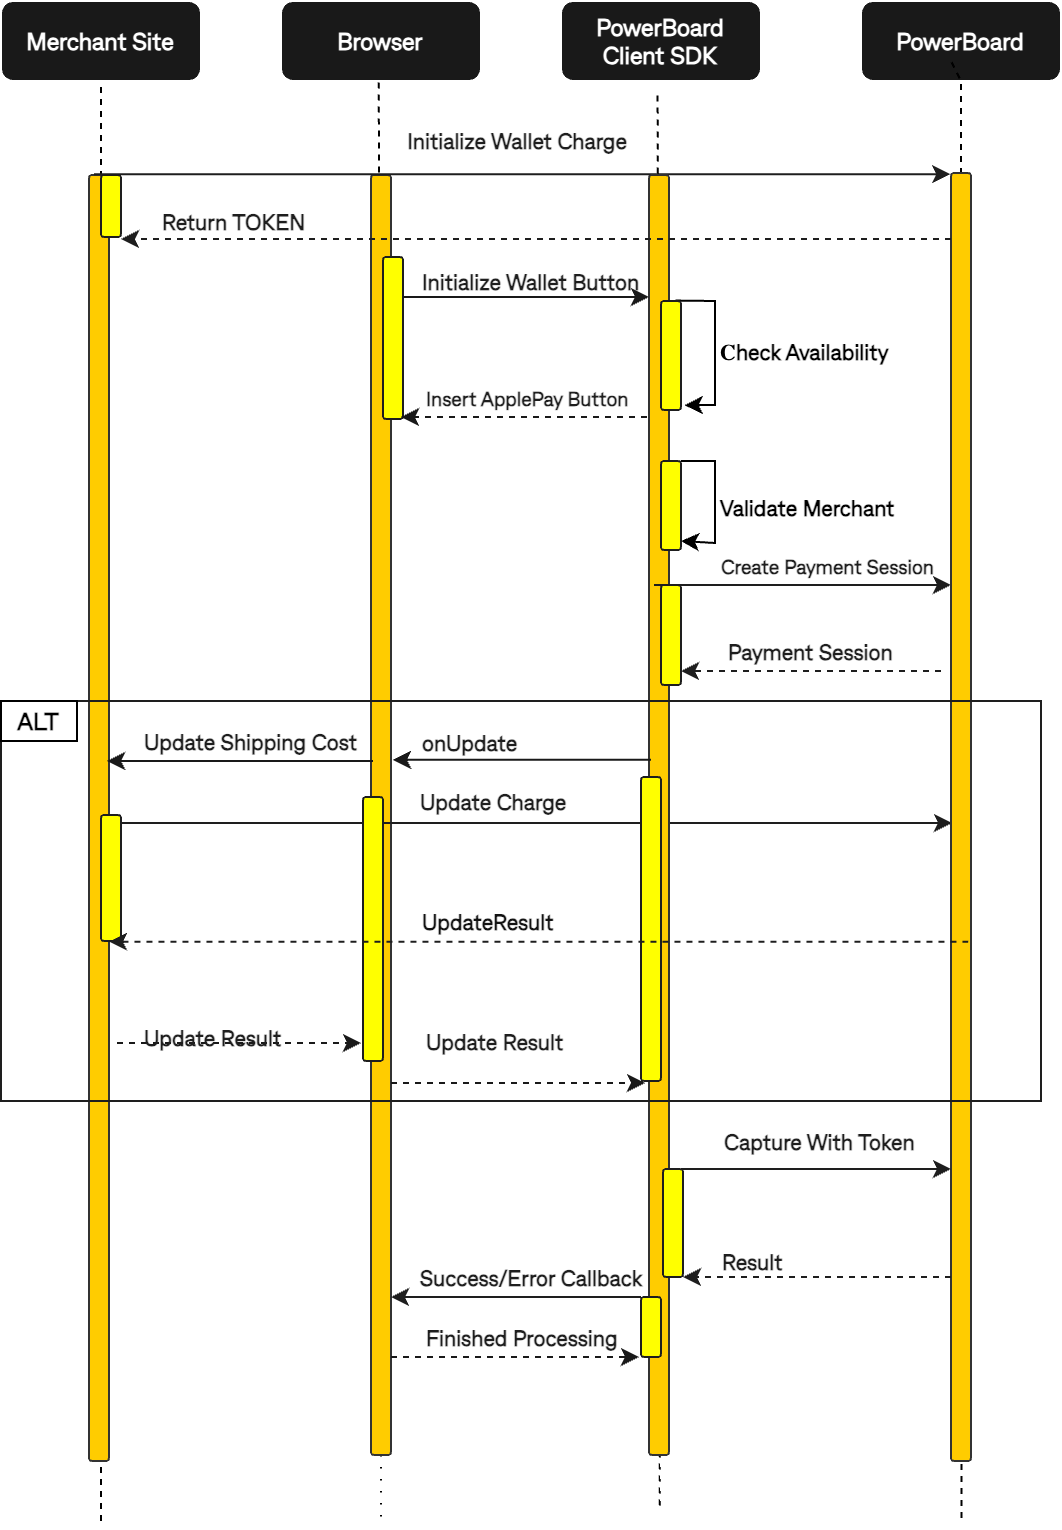
Apple Pay Sequence Diagram
Here's a sequence diagram description that shows how to create a charge using Apple Pay:
- The wallet charge creation process is initiated by the Merchant Site, which sends a request to PowerBoard.
- In response, PowerBoard provides an initialization token to the Merchant Site.
- The Browser requests the initialization of the Apple Pay button from the PowerBoard Client SDK.
- The Client SDK checks availability and retrieves necessary payment details.
- The next step involves the validation of the Merchant by the PowerBoard Client SDK.
- The PowerBoard Client SDK is requesting that PowerBoard create a payment session.
- The PowerBoard Client SDK receives the outcome of the payment session creation from PowerBoard.
- If additional information is needed regarding the Shipping Contact and Shipping Method, Client SDK requests the necessary information update from the Browser.
- The Browser requests an update of the Shipping Cost from PowerBoard.
- The Merchant Site updates the charge and directly sends the result to PowerBoard.
- PowerBoard sends the updated result back to the Merchant Site, which is then passed through the chain: Merchant Site -> Browser -> PowerBoard Client SDK.
- The PowerBoard Client SDK initiates the capture process by sending a corresponding request to PowerBoard, along with the encrypted token. The PowerBoard decrypts the token and processes the charge creation.
- PowerBoard sends the result back to the PowerBoard Client SDK.
- The PowerBoard Client SDK provides the Browser with a success/error callback.
- The Browser notifies the Client SDK about the completion of processing.
Google Pay
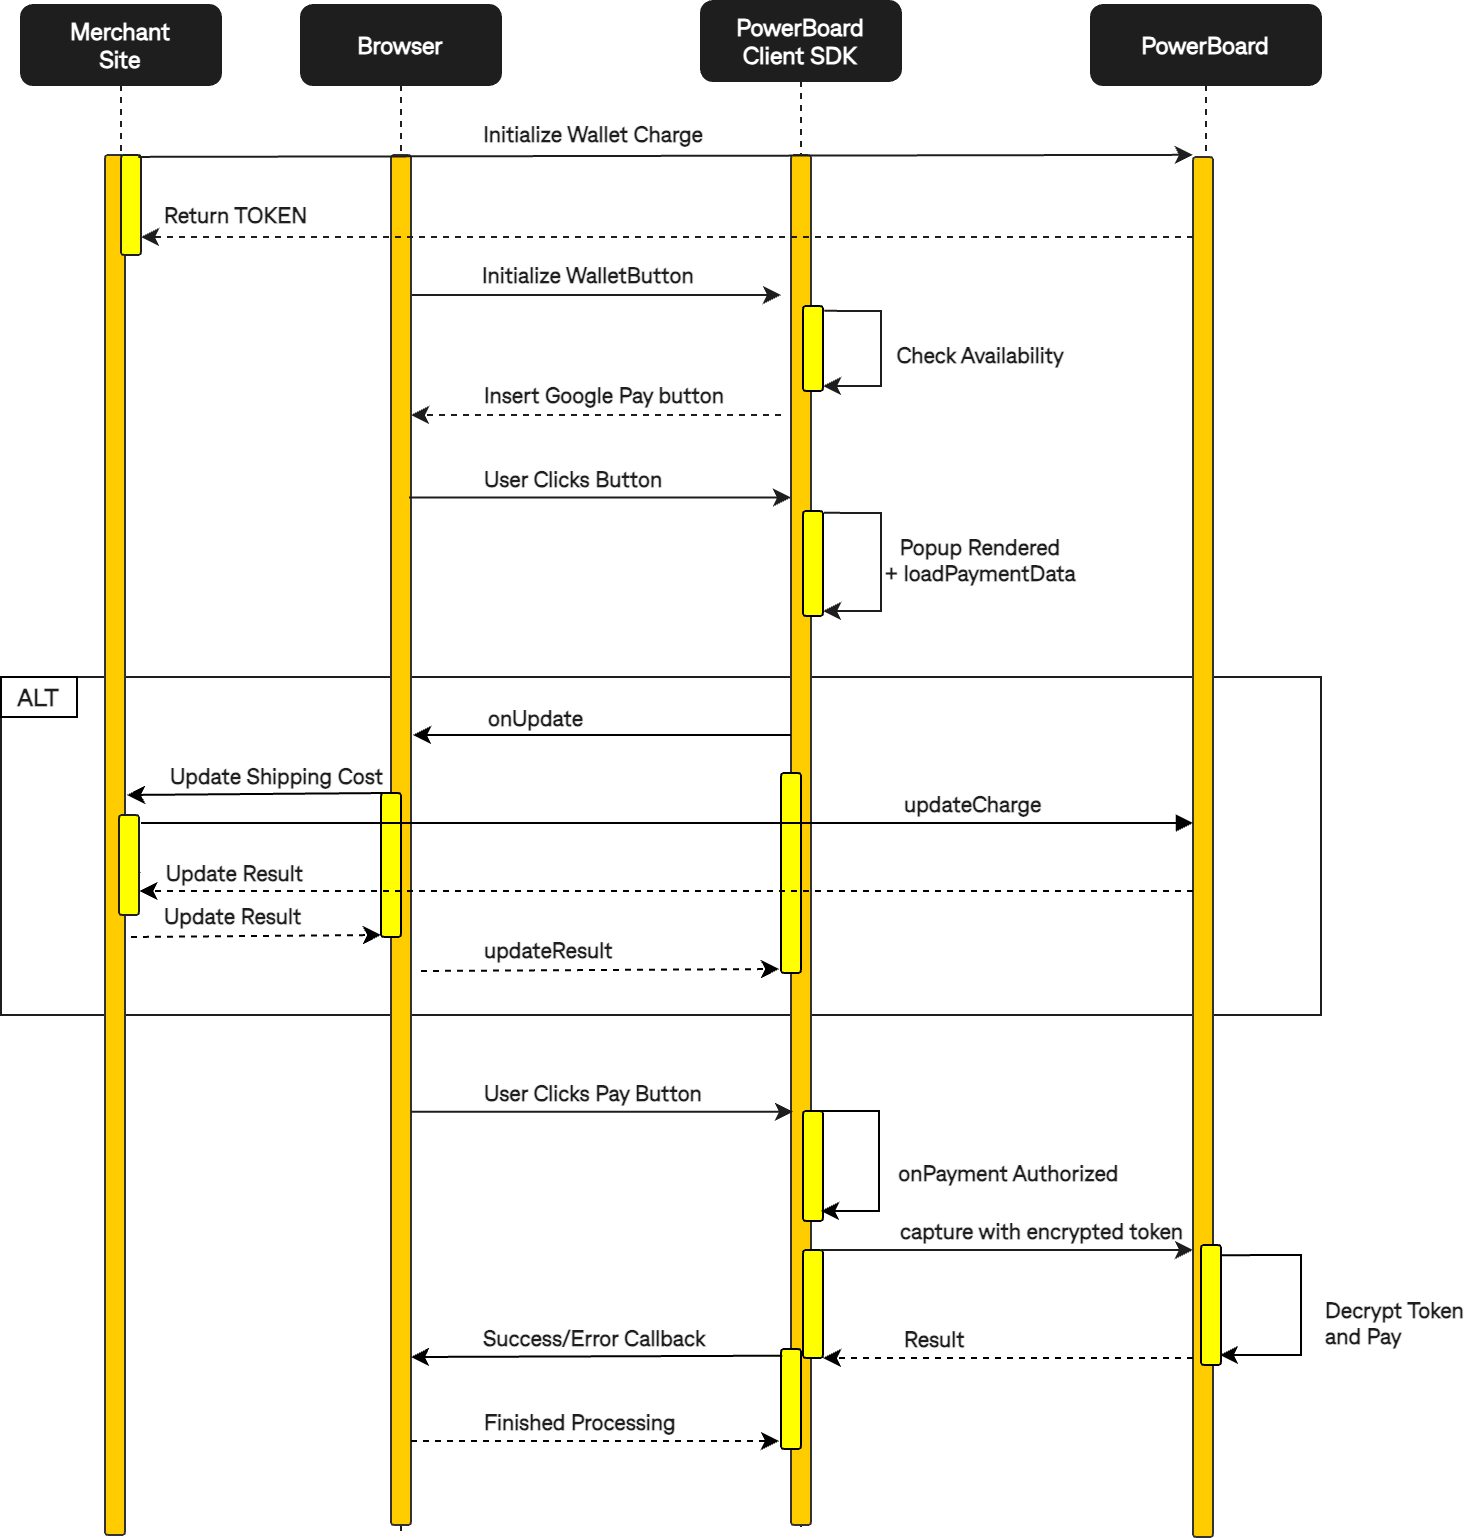
Google Pay Sequence Diagram
Below is a description of a sequence diagram that illustrates the process of creating a charge using Google Pay:
- The wallet charge creation process is initiated by the Merchant Site, which sends a request to PowerBoard.
- In response, PowerBoard provides an initialization token to the Merchant Site.
- The Browser requests the initialization of the Google Pay button from the PowerBoard Client SDK.
- The Client SDK checks availability and retrieves necessary payment details.
- Once confirmation is received, the Client SDK inserts the Google Pay button into the Website.
- The user selects the Google Pay button on the Browser, triggering the payment process.
- SDK renders a popup window requesting the loading of payment data.
- If additional information is needed regarding the Shipping Contact and Shipping Method, Client SDK requests the necessary information update from the Browser.
- The Browser requests an update of the Shipping Cost from PowerBoard.
- The Merchant Site updates the charge and directly sends the result to PowerBoard.
- PowerBoard sends the updated result back to the Merchant Site, which is then passed through the chain: Merchant Site -> Browser -> PowerBoard Client SDK.
- The user clicks the "Pay" button on the Browser, triggering a payment-authorized request.
- The PowerBoard Client SDK initiates the capture process by sending a corresponding request to PowerBoard, along with the encrypted token.
- The PowerBoard decrypts the token and processes the charge creation.
- PowerBoard sends the result back to the PowerBoard Client SDK.
- The PowerBoard Client SDK provides the Browser with a success/error callback.
- The Browser notifies the Client SDK about the completion of processing.
Checkout Integration ( ZipPay, Afterpay v1)
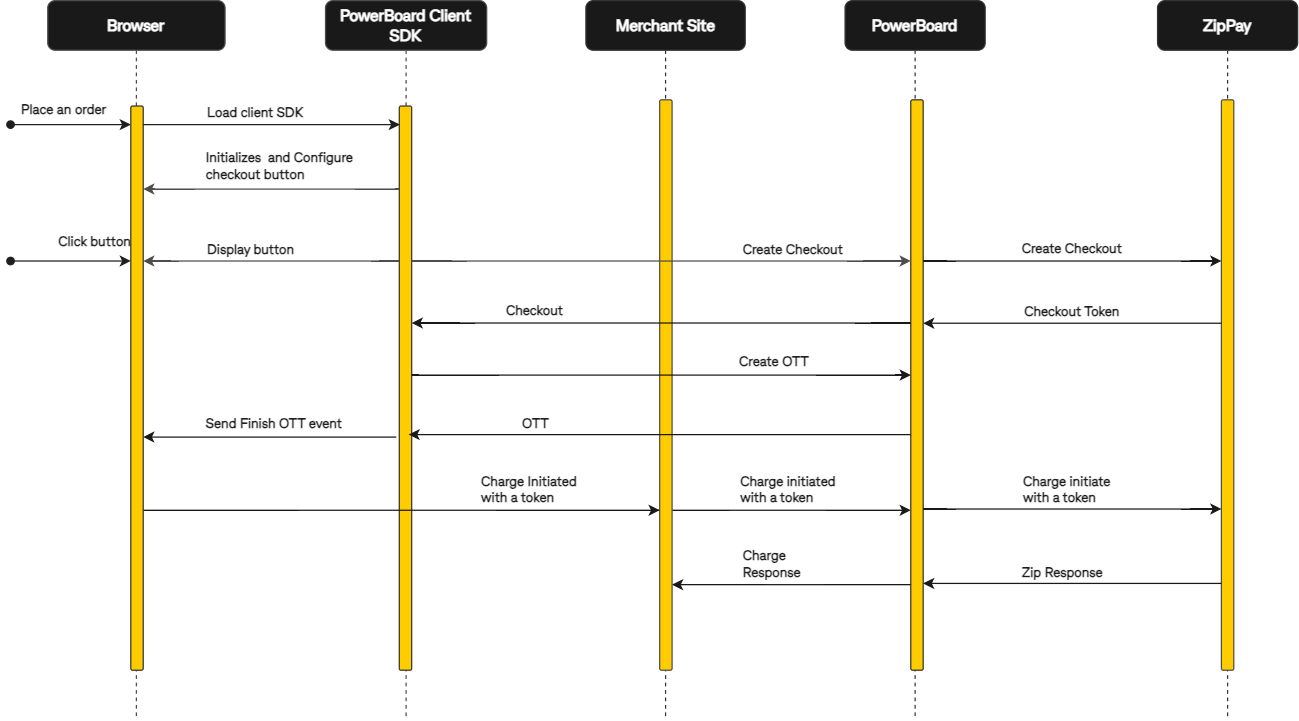
Sequence Diagram
Below is a description of the steps involved in using a checkout service to create a charge:
- When placing an order, the Browser loads PowerBoard Client SDK.
- The PowerBoard Client SDK initializes and configures a checkout button, which is then displayed on the website.
- Upon clicking the button, the checkout creation process is triggered on Client SDK and sent the request to PowerBoard.
- PowerBoard initiates the checkout process using Client SDK.
- PowerBoard Client SDK requests the creation of a one-time token (OTT) from PowerBoard.
- PowerBoard generates a new OTT and sends it back to PowerBoard Client SDK. The SDK notifies the Browser of the OTT creation by triggering a "Finish OTT" event.
- Using the newly created OTT, the Browser initiates the Charge by sending the payment data to the Merchant Site.
- The Merchant Site collects all the data received from the website and forwards it to PowerBoard for further processing.
- PowerBoard generates a charge response and shares it with the Merchant Site.